“`html
Why Softwood Stains Blotch Unevenly
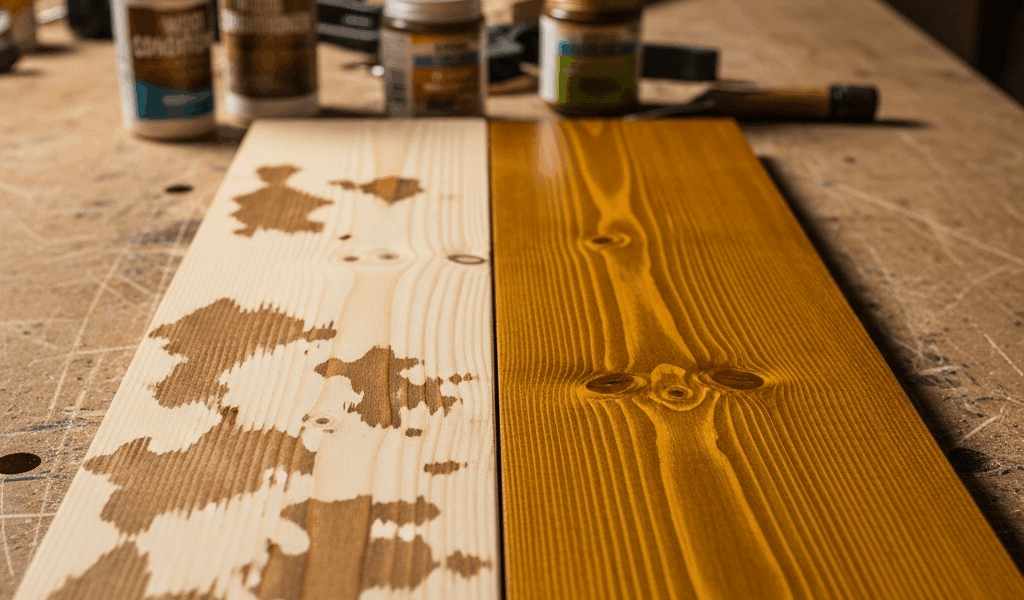
I spent an entire Saturday refinishing a pine dresser I’d picked up at an estate sale. Two hours in, I realized the stain looked like someone had spilled coffee across it — dark patches competing with washed-out blonde streaks. That’s when I learned that wood stain blotching on softwood isn’t a technique failure. It’s wood physics.
Softwoods like pine, fir, and spruce have fundamentally different cellular structures than hardwoods. Their grain runs inconsistently. Some areas have tight grain clusters that repel stain like waxed paper. Others — particularly the earlywood sections — absorb stain like a bathroom sponge. Pine is the worst offender. Those resin pockets that give pine its characteristic smell? They actively repel water-based stains while adjacent wood cells drink them in.
Cheaper lumber makes this worse. Home Depot 2x4s and standard pine boards contain massive density variations within single pieces. You’ll see darker grain lines running through lighter sections. Stain pools in those low-density areas, creating the blotchy, uneven look that makes professional finishers wince.
Eastern white pine and ponderosa pine are particularly prone to blotching. Western red cedar and Douglas fir follow close behind. The open grain structure of these woods creates natural absorption valleys. Liquid stain molecules settle into these valleys and concentrate there, leaving adjacent areas starved for color.
Pre-Stain Wood Conditioner — The Right Way
Probably should have opened with this section, honestly. Wood conditioner is the single most effective prevention tool. But I see people use it wrong constantly.
Here’s the correct sequence: sand your wood completely, then apply wood conditioner as a separate step, then wait the specified time before staining. Most woodworkers either skip this entirely or apply conditioner and stain too quickly, negating its effect.
The best pre-stain conditioners I’ve used are Minwax Wood Conditioner (the standard option at $7–9 per quart), Zinsser SealCoat (technically a sanding sealer but works beautifully), and Sherwin-Williams ProClassic Primer for heavier-duty applications. Minwax is your baseline. It works consistently on pine and fir.
Application timing matters more than the product itself. Apply conditioner with a brush or rag, moving with the grain. Use a thin coat — not dripping, not soaked. Wait the full time the label specifies. Minwax says “24 hours for water-based stains, 4–8 hours for oil-based.” I typically wait 24 hours regardless. Rushing this step defeats the purpose.
The conditioner seals those high-absorption earlywood cells just enough to slow stain penetration. It doesn’t prevent absorption entirely. Instead, it equalizes the absorption rate across the entire surface, so stain dries more evenly.
Here’s the myth that needs dismantling: “Wood conditioner weakens the final stain color.” False. Yes, the first coat will appear lighter than if you’d stained raw wood. The second coat will match or exceed the color depth. You’re trading first-coat intensity for even color distribution and a professional appearance. That’s a fair deal.
Sanding and Surface Prep Before Staining
Sanding affects blotching more than people realize. Too-fine grit closes the grain surface and traps stain on top. Too-coarse grit leaves scratches that absorb stain unevenly.
Target 150–180 grit. This is the sweet spot for softwood. It opens the grain enough to accept stain reasonably, but not so much that you create absorption highways. I typically use 150 grit on the first pass, then finish with 180. Skip anything finer than 180. Your wood will thank you.
Dust removal method matters. Use a soft brush or tack cloth after sanding — not compressed air. Compressed air forces dust deeper into grain pores where it interferes with stain absorption. A tack cloth (the sticky fabric you find with wood finishes at hardware stores) removes dust without pushing it around. Wipe the entire surface, especially grain lines and edges.
I once skipped the tack cloth and wondered why my stain looked chalky. Turns out fine sanding dust sitting in the grain pores was blocking stain penetration. One 30-second tack cloth pass solved it.
If you’re working in a dusty environment, sand, let dust settle for 15 minutes, then tack cloth. Don’t rush to staining immediately.
Three Staining Techniques That Reduce Blotching
Gel stain versus liquid stain changes everything on softwood. Gel stain sits thicker on the surface. Less penetrates deep. For blotch-prone wood, this is actually an advantage. Gel stain (like Minwax Gel Stain, roughly $10 per quart) applies thicker and dries more slowly, giving conditioner more time to do its job. The trade-off: gel stain doesn’t penetrate as deeply, so the finish feels more like a surface coat than an absorbed color.
Liquid stain absorbs faster and penetrates deeper. It produces richer color but demands perfect wood prep to avoid blotching. If you’re choosing between them, softwood demands gel stain. Period.
Wiping versus brushing technique matters too. Brushing applies stain more aggressively. You’re forcing liquid into the grain with every stroke. Wiping applies a thinner layer. Use a folded cotton rag, damp it with stain, and wipe with the grain in long strokes. Let the stain sit for 5–10 minutes, then wipe away excess. This technique prevents pooling in low-density areas.
The “wet edge” method keeps one edge of your work constantly wet as you move across the surface. You’re essentially staining faster than the wood can absorb unevenly. This minimizes the contrast between early-stained areas (which have absorbed more) and later areas (which absorb differently as the surface dries). It sounds counterintuitive, but it works. Keep your rag damp and your pace steady.
Test every technique on a scrap piece of the same wood. I’ve done this for five years and still test. Pine scrap costs nothing. Ruining a tabletop costs everything.
Fixing Blotchy Stain After It Happens
Sometimes blotching happens anyway. Accept that reality, then act.
The nuclear option: sand it back. Use 150 grit, sand until the blotchy stain is largely gone (you’re removing the stain layer, not the wood). This takes time — expect 1–2 hours for a table surface. Then start over with conditioner and a different technique. This works. It’s also exhausting.
Wood bleach (like Bartley’s wood bleach) can lighten dark blotchy areas, but it’s imprecise. Apply it to dark spots with a small brush. It lightens everything, not just dark areas. You might end up with reverse blotching — light spots on dark wood. Only attempt this if the blotching is severe and you’re prepared to refinish completely if bleach creates new problems.
Accept it. This is honest advice. If blotching is mild — say, 20–30% color variation across the surface — you might live with it. Once you apply topcoat (polyurethane, poly, lacquer), the variation becomes less obvious. Not invisible. Less obvious. Honest assessment: this doesn’t solve the problem, it delays acknowledging it.
The “when to start over” decision: if blotching affects more than 40% of the visible surface, sand back and redo it. The time investment pays off in a finish you’ll actually enjoy looking at. If it’s isolated to edges or hidden areas, live with it.
Here’s what I wish someone had told me during my estate sale dresser disaster: prevention isn’t optional on softwood. It’s mandatory. Wood conditioner, correct sanding grit, and a disciplined application technique prevent blotching more reliably than any fix applied afterward. Spend an extra 48 hours on prep. Your finish will look professionally done instead of like your first attempt.
“`


Stay in the loop
Get the latest master wood crafters updates delivered to your inbox.