Why Wood Glue Fails in the First Place
Wood glue troubleshooting has gotten complicated with all the vague “proper technique” advice flying around. As someone who has personally destroyed expensive stock over every possible gluing mistake, I learned everything there is to know about why these joints actually fail. Today, I will share it all with you.
Here’s the short version: dirty surfaces, wrong adhesive, bad clamp pressure, or insufficient cure time. Four causes. That’s it. Every failed joint traces back to one of them — sometimes two if you’re having a really bad day in the shop.
The good news? Identifying the right cause takes about two minutes of inspection. The bad news? Guessing wrong means another ruined batch of stock. Don’t make my mistake.
Your Surfaces Were Not Ready to Glue
This is the culprit roughly 60% of the time. A glue joint is only as strong as the wood fibers it actually contacts — and anything sitting between the glue and those fibers kills the bond immediately. Sawdust. Dried skin oil. Old finish. A glazed surface from machine planing. Any of it.
Here’s what “not ready” looks like in practice. You joint two boards on a thickness planer, set them on the bench, answer an email, come back 45 minutes later, and clamp them up. That jointed face now has a microscopic waxy layer — from the planer blades and from sitting in workshop air. That layer is invisible. It is also completely lethal to adhesion.
Same story with sanding dust. You hit the surface with 150-grit, blow it off with compressed air, and figure you’re done. But dust is still embedded in the grain, especially in softer species like pine or cedar. The glue can’t penetrate past it. It just sits on top.
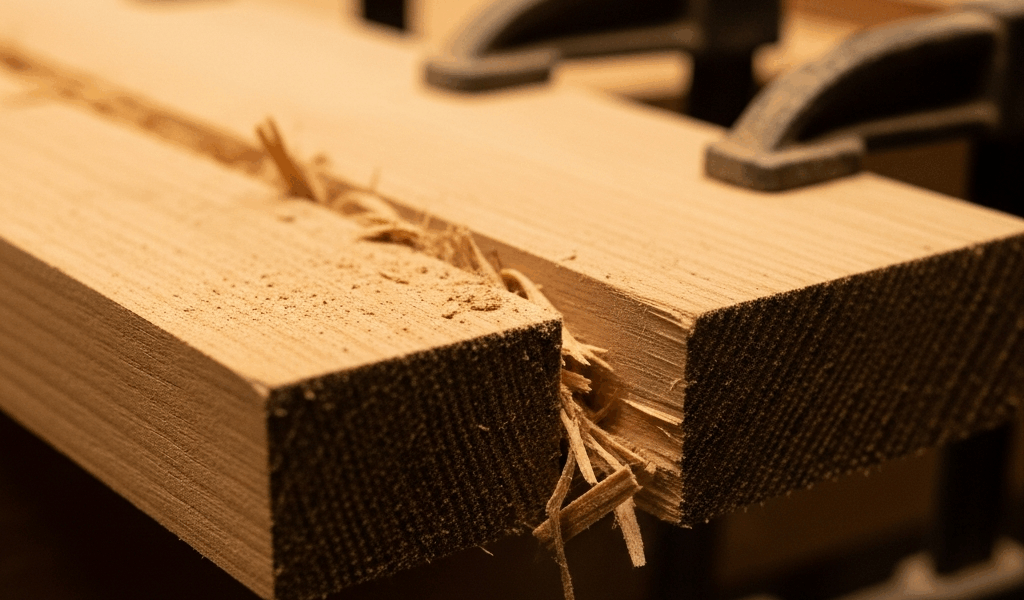
How to diagnose this: look at your failed joint. If you can pull the two pieces apart by hand without much resistance, and the glue stayed on both surfaces rather than peeling cleanly off one side — that’s a glue-to-wood adhesion failure. The glue bonded to itself. Not to your wood.
The fix is wipe both gluing surfaces with a dry cloth immediately before assembly. If the surface was jointed or planed more than two hours ago, re-joint it. Fresh wood fibers are porous. Aged ones are not. I learned this the hard way — eight board feet of quarter-sawn white oak, $47 worth of material, turned into a cabinet door that separated under its own weight six months later.
Also: stop touching the gluing surface with bare hands. Skin oils create a barrier. Wear nitrile gloves after prep work, or at minimum keep the gluing edge away from your palms.
Clamp Pressure and Open Time Mistakes
Probably should have opened with this section, honestly — it trips up more intermediate woodworkers than beginners. This category actually contains two separate problems disguised as one.
Starved Joints from Low Clamp Pressure
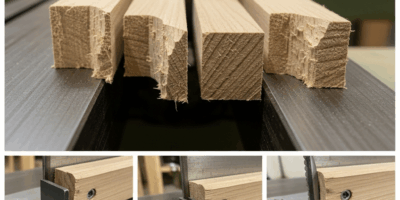
A starved joint happens when clamp pressure is too low. The glue stays thick between the surfaces instead of squeezing into the grain. There’s a visible gap line where the pieces meet. The bond is brittle — you can sometimes snap it by hand over your knee.
How much pressure do you actually need? For standard PVA like Titebond II on hardwoods, aim for 100 to 150 pounds per square inch. On a 1-inch-wide joint, that’s roughly 100 to 150 pounds of total clamping force. A single bar clamp rated at 600-pound capacity handles that fine. Two clamps are safer — they distribute pressure evenly and keep the pieces from cupping during cure.
The quick mental check: you should see glue squeeze-out along the entire joint line. Not a flood. A thin, consistent bead. No bead at all means you’re under-clamped.
Exceeding Open Time
Open time is how long the glue stays workable after application. PVA adhesives typically give you 10 to 15 minutes at 70°F. In a cold shop — say, 55°F — that stretches to around 25 or 30 minutes. Miss that window and the glue skins over. You can still assemble and clamp, but the bond will be weak because the adhesive is already semi-cured at the surface.
I’m apparently a slow assembler, and Titebond Original works for me while extended open-time formulas never seemed necessary — until one November in a 50°F garage. I thought the cold-extended open time meant I could take my time. I could not. By the time I drove the tenon home on a mortise-and-tenon joint and reached for my clamps, the glue had skimmed over enough that I felt resistance. The joint was weak from day one. That was 2019. I still think about it.
To diagnose this failure: if the joint separated slowly under twisting force rather than snapping, and there’s a thin rubbery film of cured glue on both faces — you waited too long before clamping.
The fix: keep your shop above 65°F when gluing. If you work cold, use a heat lamp to warm the stock for 20 minutes beforehand. Lay out all your clamps before the glue bottle comes out. Dry-fit the assembly once. Then apply glue and clamp in one deliberate motion — no detours.
Wrong Glue for the Job
But what is standard PVA adhesive? In essence, it’s the amber stuff in most hardware stores — Titebond II being the most common — and it works beautifully on face-grain joints in common hardwoods. But it’s much more than just a general-purpose glue. It has real, specific limitations that most product descriptions won’t tell you plainly. That’s what makes knowing these failure modes so valuable to us woodworkers.
End Grain
End grain absorbs glue like a sponge — the adhesive disappears into the wood instead of staying at the surface, leaving a starved joint. You can’t clamp harder to compensate. The glue is already gone. The solution is sizing the end grain first: apply one thin coat of PVA mixed 50-50 with water, let it dry fully, then apply normal glue and clamp. The first coat seals the pores. The second coat actually bonds the surfaces. Adds about 20 minutes to the process. Saves the joint entirely.
Oily Tropical Hardwoods
Teak, rosewood, and certain other exotics contain natural oils that actively repel water-based adhesives. Standard PVA won’t stick — period. You need epoxy or a glue specifically formulated for oily woods. West System 105/207 epoxy at around $45 for a starter kit is a reliable choice, as is Titebond III for less extreme cases. That is because the bond depends on mechanical penetration into the fiber, and oil physically blocks that penetration.
Outdoor Projects
Type II PVA is water-resistant — not waterproof. It will fail outdoors over time, usually within three to five years depending on exposure. Type I is waterproof, but even that benefits from a complementary finish to protect the joint from direct weathering. For anything that lives outside, use epoxy or a polyurethane-based adhesive like Gorilla Glue. They run $12 to $20 more per project but will last 20 years instead of five. So, without further ado — just use the right glue from the start.
How to Test and Rescue a Bad Glue Joint
First, assess whether the joint is salvageable. Grip both pieces and twist gently. Easy separation means the glue never bonded. Resistance followed by a clean snap means the glue bonded to itself but not to one or both wood surfaces. Both scenarios are fixable. If the wood fiber itself tore or crushed — that’s a loss. Mill new parts.
To rescue a recoverable joint: use a sharp 3/4-inch chisel to scrape away the cured glue. Work at a low angle, taking thin shavings. This takes patience — probably 15 minutes per joint surface. Once both faces are clean, sand lightly with 150-grit to restore tooth, wipe clean with a dry cloth, and re-glue using whichever corrected method your diagnosis pointed to.
Success looks like a glue line so thin you barely see it, pieces that require a mallet to separate, and a joint where the surrounding wood fails before the glue does.
Even experienced woodworkers debug glue failures regularly. The difference is they work backward from the evidence instead of guessing — and they stop touching their freshly-jointed surfaces with bare hands. That’s it. That’s the whole secret.

Stay in the loop
Get the latest master wood crafters updates delivered to your inbox.