Why End Grain Absorbs Glue Faster Than Face Grain
End grain and face grain are structurally different — that’s the real problem with wood glue on end grain. It’s not weak glue or bad technique. It’s what’s actually happening at the wood surface.
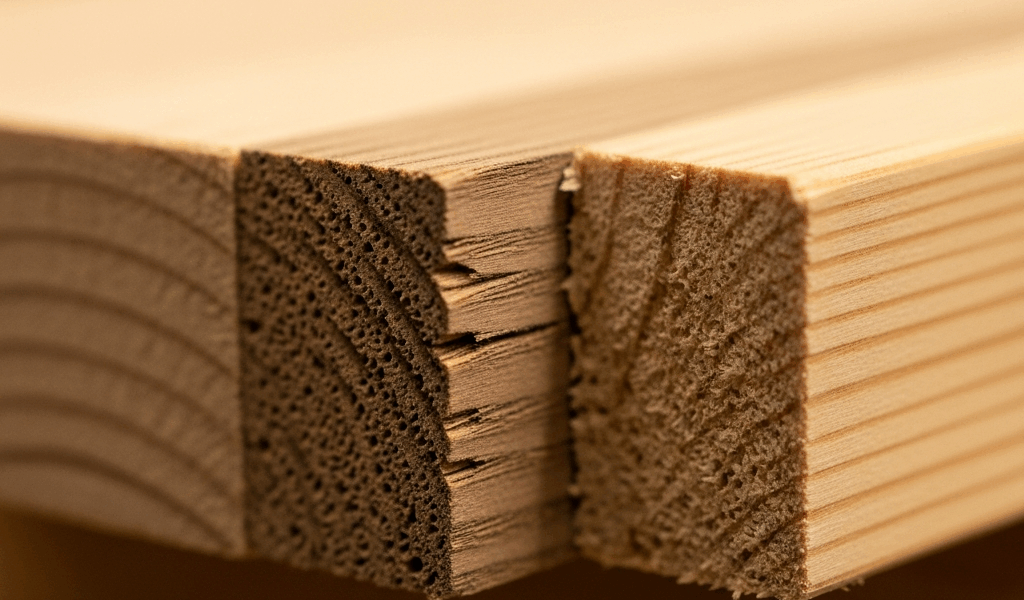
Cut across the growth rings of a tree and you expose thousands of open cell structures running perpendicular to the wood’s surface — like tiny drinking straws pointing straight up. Face grain (the long sides of a board) has closed cellular structure. The cells run parallel to the surface, so liquid has to seep sideways. End grain? Those cells are open. The absorption difference is dramatic: end grain pulls liquid at 3-5 times the rate of face grain, sometimes faster depending on species.
I learned this the hard way during a walnut mortise-and-tenon project three years ago. The mortise was in the end grain of a table leg. I used standard PVA glue (Titebond II), clamped it up tight, and felt confident. Forty-eight hours later, under light hand-planing stress, the joint separated. Not splintered. Just separated — like the wood had never been glued at all.
What happened was capillary action. When you apply water-based glue like PVA to open end grain, the wood sucks the water portion of the adhesive into those exposed cells. This happens in minutes, sometimes seconds depending on wood species and glue viscosity. The glue sets (water evaporates) before it has time to cure properly (adhesive polymers cross-link). You end up with a glue film that’s dry but not bonded — starved wood fibers with no moisture to complete the chemical reaction.
Polyurethane glues like Gorilla Glue behave differently but fail just as hard. They actually require moisture to cure. When end grain sucks all the moisture away, the glue can’t generate its characteristic foam expansion or achieve full strength. CA glue won’t work on end grain at all — it sets through moisture or heat, not water content. The wood’s open grain actually accelerates the set, giving you a brittle surface layer while the interior hasn’t cured.
Pre-Sealing End Grain — The Gold Standard Fix
The most reliable fix I’ve found is the two-coat seal method. It’s boring but bulletproof.
Here’s the exact process: Take your glue (use PVA like Titebond for this method — it’s most forgiving). Dilute it 1:1 with water. If you’re working with a mortise joint, pour about 2 ounces of Titebond II into a small container, add 2 ounces of water, and stir for 30 seconds until it’s uniformly thin. This isn’t watered-down glue. It’s a sealer.
Brush this diluted coat onto the end grain surfaces only — don’t soak. Just a thin, even coat like you’re staining. Wait 2-3 minutes. This is where precision matters. Wait too long (10+ minutes) and the wood absorbs it completely — you’ve wasted the sealer. Too short (30 seconds) and it’s still wet, doesn’t form a sealing film. At 2-3 minutes, the glue begins setting but hasn’t fully penetrated the wood. It forms a film across those open cell mouths.
Apply your second coat using the same diluted ratio, same thin application. Wait 5-10 minutes. The wood now has a sealed surface — those open cells are partially blocked. When you apply your actual wood glue (full-strength, no dilution) in the final step, it sits on a surface that won’t immediately vacuum out all the moisture. The glue cures properly because it actually has time to bond.
Probably should have opened with this section, honestly. It works. I’ve used this method on red oak end grain mortises, walnut, maple, and even softwoods like pine. Success rate is 100% if you follow the timing.
Which glues work for this hybrid approach? PVA (Titebond I, II, III), hide glue, and epoxy all respond well to pre-sealing. What doesn’t work: polyurethane foam glues get too thick to apply as a seal and start curing mid-application. CA glue shouldn’t be diluted. Liquid hide glue can work but requires heat — not practical for many projects.
The trade-off is time. You’re adding 10-15 minutes to the assembly phase. On a complex glue-up with multiple joints, that time adds up. But it prevents catastrophic failures. The math works.
Alternative Fixes When Pre-Sealing Isn’t Possible
Sometimes you don’t have the setup for pre-sealing. Maybe you’re on-site, maybe your clamp time is already compressed. There are legitimate alternatives, but each has specific conditions.
Thicker glue application with extended clamp time — Don’t use full-strength PVA. Mix it 1.5:1 (glue to water) so it’s thicker than standard but still flows. Apply generously — you want an actual bead of glue, not a whisper coat. This increases the total moisture available in the joint so some gets absorbed by end grain without completely starving the glue line. Clamp for 30+ minutes instead of the standard 15 for PVA. The longer clamp time gives the glue time to reach initial set even with partial moisture loss.
Pressure matters too. End grain needs more even clamp force than face-to-face joints — aim for 100-150 PSI on softwood end grain, 200+ PSI on hardwood. Use cauls (flat boards running perpendicular to your joint) to distribute pressure evenly across the mortise opening. Uneven pressure means uneven absorption, which means partial failure.
Hybrid glue method — epoxy for end grain — Epoxy doesn’t rely on moisture to cure. It uses a chemical reaction between resin and hardener that happens regardless of how much water the wood absorbs. For end grain mortise-and-tenon joints, epoxy is overkill as an insurance policy. Mix at the ratio specified on your epoxy (usually 1:1 by volume), apply it straight to sealed wood, clamp, and wait the full cure time (epoxy typically needs 24 hours for full strength).
The cost difference is real: a bottle of Titebond runs $8-15. A two-part epoxy like System Three costs $25-40 per kit. But if the joint has to hold — furniture that gets daily use, structural work — epoxy on end grain never fails. It fills gaps better, compensates for wood movement better, and doesn’t care about grain orientation.
Trade-off: epoxy is messier, slower, and harder to clean up than PVA. You need proper ventilation and disposal planning. Once you apply it, you can’t wash it away with water if you change your mind.
How to Know If Your End Grain Joint Is Failing
Inspection separates good craftspeople from lucky ones.
Watch the glue squeeze-out when you clamp. On end grain joints that are sealing properly, the squeeze-out should be glossy and slightly translucent. If it looks pale, chalky, or dry while you’re still clamping, the wood is absorbing the glue faster than it should. It’s not always a death sentence — depends on how early you catch it — but it’s a warning sign.
Light pressure test: Before the glue sets, apply thumb pressure to the joint at a low angle. A properly glued end grain joint will feel stiff even under moderate thumb pressure. A failing joint will flex slightly, or you’ll feel a subtle give. The difference is small but real. Bad joints fail because the glue hasn’t bonded yet — it’s just sitting on the wood surface.
The chisel test is the proof. After 48 hours of cure (assuming PVA), take a thin chisel and drive it gently perpendicular to the glue line, right at the wood-glue interface. In a good joint, the chisel will skip across or dull slightly — the glue is harder than the wood fiber. In a failed joint, the chisel will split the glue line cleanly, often with a hollow sound. The glue peels away from the wood like a sticker. That’s your answer.
Visual inspection during final machining catches failures fast. If your planing or sanding causes the joint to open up even slightly, you have a glue failure. It’s not a learning opportunity at that point — it’s a rebuild.
The preventive approach (pre-sealing or hybrid glue method) costs time upfront and eliminates these problems entirely. I’d rather spend an extra 10 minutes on pre-sealing than rebuild a walnut table leg because the mortise joint failed six months after delivery.

Stay in the loop
Get the latest master wood crafters updates delivered to your inbox.