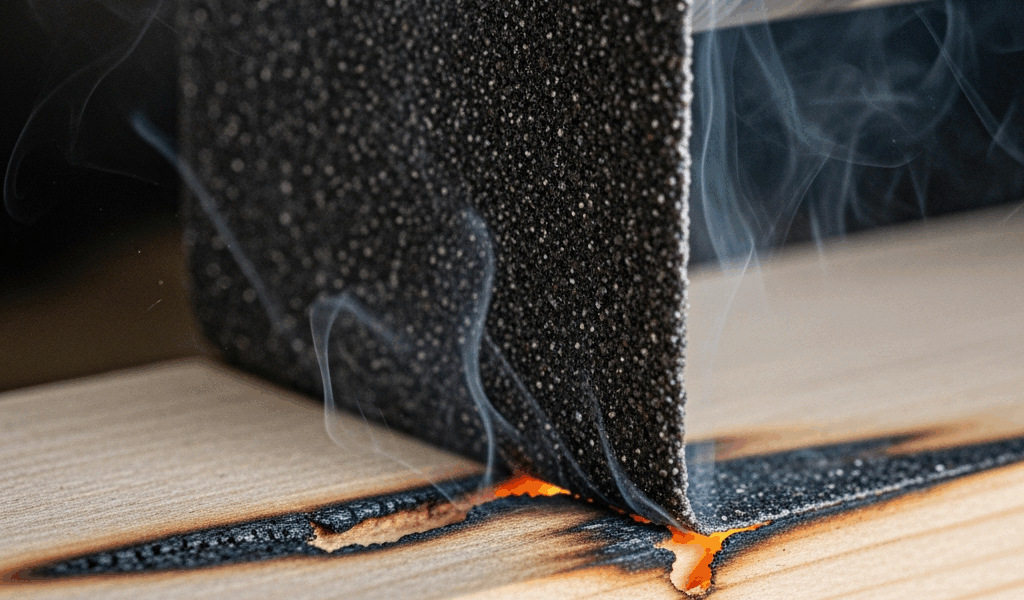
Why Your Belt Sander Is Burning the Wood
Belt sander burning has gotten complicated with all the half-baked advice flying around. Most of it skips the actual cause and jumps straight to “buy a new belt.” That fixes nothing if your technique is the real culprit — you’ll just burn through the new one too.
I learned this the hard way. Three weeks milling a walnut tabletop, then one bad sanding session left a dark stripe across the whole panel. That was a Tuesday I’d rather forget. What I figured out afterward changed how I use every abrasive tool in my shop.
So what actually causes wood to burn under a belt sander? In essence, it’s friction heat spiking faster than the wood can shed it. But it’s much more than that. The contact point between grit and wood fiber genuinely reaches temperatures that char the surface — not gradually, but fast. Three things make it happen: loaded grit, excessive downward pressure, and wrong grit selection for your species. Usually it’s at least two of those working together.
Loaded grit is when sawdust and wood resins pack into the spaces between abrasive particles. Your belt stops cutting and starts glazing. Glazed belts generate heat instead of removing material. Press too hard on top of that — which most people do instinctively — and the motor bogs, belt velocity drops, and the grit lingers over the same fibers too long. Heat builds. Wood burns. You stare at the damage wondering where you went wrong.
That’s what makes this problem so frustrating to diagnose. Each cause feeds the others.
How to Tell If Your Belt Is Loaded or Just Worn Out
Get a flashlight. Seriously — unplug the sander, flip it upside down, and look at the belt in decent light. A loaded belt looks dusty-gray or glazed between the grit peaks, almost like someone brushed a thin film of dried material across it. A worn-out belt looks uniformly shiny, with grit that’s flattened down to nothing. No amount of cleaning brings that back.
Here’s the rubber eraser trick I use before scrapping any loaded belt. Grab a standard pink pencil eraser — the cheap ones work best, honestly — and rub it firmly across the belt surface while rotating the belt away from you by hand. It lifts clogged sawdust and dried resin right out of the grit valleys. Keep going until you see clean grit again. One session’s worth of loading often comes off completely. I’ve brought belts back from what looked like certain retirement this way.
But know when cleaning is just theater. Shiny, flat grit means the abrasive is done. Erasing won’t restore cutting edges that aren’t there anymore. Replace it — a fresh 80-grit Diablo or 3M 947A costs maybe $4 to $6 and saves you from scorching a $60 board.
Wood species matter more than most people account for. Pine, cherry, and walnut load belts fast because their natural oils and resins don’t want to dust off — they want to stick. I watched a pine face-sanding job turn into a loaded-belt situation in under twenty minutes once. Maple and ash are friendlier. Exotic species like rosewood? Load time is measured in seconds if you’re not careful and not using the right belt type.
Pressure and Feed Speed Are Probably the Real Problem
Probably should have opened with this section, honestly. Most burning isn’t a belt problem at all — it’s the person holding the sander leaning into the wood like they’re trying to flatten it by force.
When you press hard, the motor works against that load. Belt velocity drops. Grit stays in contact with the same fibers longer. Resin starts cooking instead of turning to dust. You get a dark stripe and a faint burning smell, and by the time you notice it, the char is already a millimeter or two deep.
The correct technique feels wrong at first. Let the belt do the work — genuinely. Use your hands to guide the sander in smooth, overlapping passes, the way you’d roll paint across a wall rather than scrub a stain out of carpet. The sander weighs enough on its own. A Makita 9903 runs about 8.8 lbs. A DeWalt DWDS7000 is around 9 lbs. That weight, combined with the motor speed, is all the cutting force you need. Your job is to move it, not press it.
Concrete feel cue: if your forearm is straining, you’re pressing too hard. When the sander glides across the surface on its own weight with the motor spinning free, belt speed stays consistent. Heat doesn’t build. Grit lasts noticeably longer. I’m apparently a chronic over-presser and switching to a lighter touch was the single biggest improvement I made — and a Makita works for me while the pressure habits I built with my old Craftsman never did anything but burn wood.
Don’t make my mistake. Keep moving. Multiple light passes beat one aggressive pass every single time.
Grit Selection Mistakes That Cause Burning
Starting too coarse seems like it should be faster. Jump straight to 60-grit on a rough-milled hardwood and you’ll need six or seven passes to flatten it. Six passes of coarse grit over the same surface — cumulative heat. You burn the piece before you ever reach finish grit.
Starting too fine creates a different problem. Use 120-grit on raw stock and the belt loads in minutes because you’re trying to remove too much material with abrasive that’s too small for the job. More passes, more heat, same result.
The sequence that works for hardwoods: start at 60 or 80, run two or three passes until the surface reads flat, then move to 120 for finish work. Softwoods often let you skip the coarser stage entirely and land at 100 or 120. Less total sanding time means less total heat exposure — and that matters more than most people realize when you’re working with resinous species.
Open-coat belts resist loading better than closed-coat. The grit particles sit further apart, leaving room for sawdust to actually escape instead of packing in. For walnut, cherry, pine — any resinous wood — open-coat might be the best option, as belt sanding these species requires consistent grit clearance. That is because their resins bond to abrasive surfaces faster than the dust can clear on a closed-coat belt. They run a dollar or two more per belt. I switched to open-coat years ago and haven’t looked back.
Quick Fixes to Try Right Now Before You Ruin the Piece
- Stop and lift the sander. The moment you see discoloration or smell something off, pull the sander away. Don’t keep running it over the same spot — you’re just pushing the char deeper into the fiber.
- Clean or replace the belt. Try the eraser trick on a loaded belt first. If the grit is already shiny and flat, that belt is done. Install a fresh one — no shortcuts here, and no amount of erasing resurrects dead grit.
- Reduce pressure and increase pass speed. Make the next pass with almost no downward force. Let the sander’s own weight handle it. Move faster than feels natural. Keep the belt spinning at full speed.
- Check wood temperature with your hand. If the surface is hot to the touch, walk away for five or ten minutes. Sanding already-warm wood accelerates burning — the fibers are already primed to char.
- Sand out light burn marks if they’re shallow. A feather-light pass with 220-grit sometimes erases minor scorch without going deeper into the wood. If the char runs deep — more than a millimeter — resawing that panel is often your only honest option.
Burned wood rarely just disappears. Accept what happened, figure out which of the three root causes got you, and move forward smarter.

Stay in the loop
Get the latest master wood crafters updates delivered to your inbox.