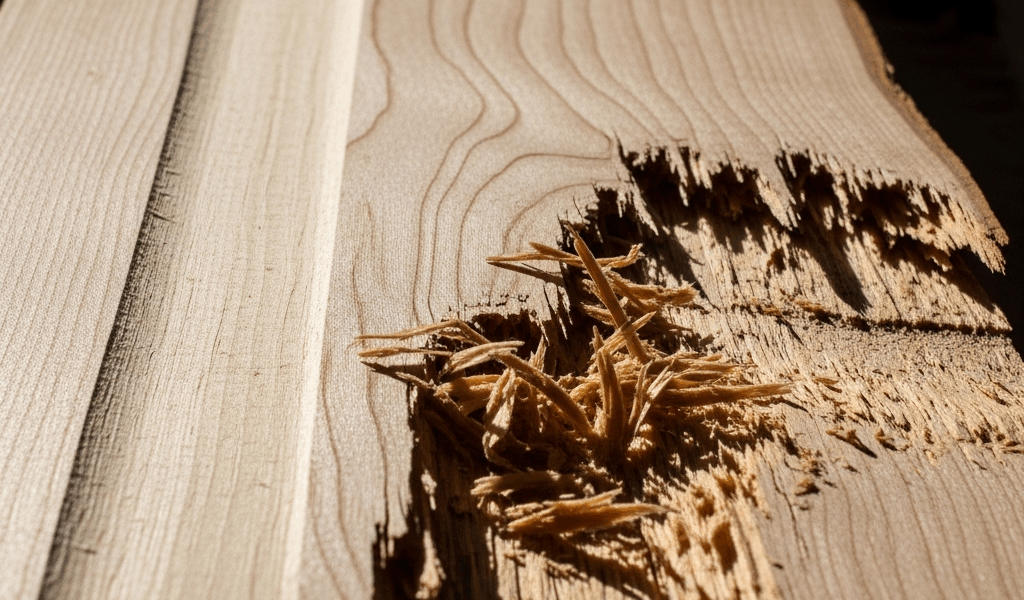
Why Figured Wood Gets Torn Up in Planers
Figured wood has gotten complicated with all the grain-direction confusion flying around. I learned the hard way that planer tearout on figured maple, spalted veneer, and quilted stock isn’t something you did wrong—it’s pure woodworking physics. The wood itself is working against you.
Here’s the thing: figured woods don’t grow with grain running one predictable direction. Instead, you get interlocking grain and reversing grain patterns. The fibers change direction constantly across a single board’s surface. Think of brushing hair backwards — brush with the grain and it lies flat, brush against it and you get resistance and breakage. Wood operates exactly the same way. A planer blade moving through interlocking grain encounters fibers that need cutting one direction, then fibers needing the opposite treatment, all within just a few inches. The blade can’t handle both simultaneously. It cuts one cleanly, then tears the other.
What makes figured wood even more endearing to us is also what makes it a minefield. Curly maple has wild undulating grain — stunning on a finished board, but it creates multiple grain directions across a single surface. Spalted wood has softer grain along decay lines that crumbles differently than sound grain. Quilted maple has that puffed, bumpy surface where grain direction shifts constantly. You’ve got $45-per-board figured maple and your planer blade doesn’t stand a chance.
Standard planer operation doesn’t work here. A typical setup feeds stock at 10–15 feet per minute with blade depth around 1/32 inch or deeper. That works fine on straight-grained pine or poplar. On figured wood? That same setup guarantees tearout — fuzzy grain, splintered edges, sometimes divots large enough to ruin the entire board.
Identify Your Grain Direction Before Planing
Probably should have opened with this section, honestly. I’ve watched woodworkers spend money on figured wood, spend money on a planer, then destroy the board by guessing at grain direction. Don’t make my mistake.
Use the light test first. Place your board in bright natural light or under a shop light — at least if you want to see what you’re actually working with. Look at the surface at a shallow angle, almost glancing across the wood rather than straight down. Grain that slopes one direction will appear lighter or darker depending on viewing angle. Tilt your head. Move the light around. The grain that appears to rise toward you as you look at the board — that’s your direction. Your planer blade should move that way, pushing the grain down as it cuts.
The thumbnail test confirms it. Use your thumbnail (not your fingernail — your actual nail bed) and run it lightly across the surface in both directions. One direction will feel smooth. The other will feel rough or catch slightly. The smooth direction is safe. The rough direction is tearout city. This works because your nail mimics what a planer blade does: it either runs with the grain fibers or against them.
Make a grain-direction card. Take a scrap of your figured wood, plane it by hand from both directions, and label each end clearly: “safe” and “tearout.” Keep this in your shop. When new figured wood arrives, reference your card to confirm you’re reading the grain correctly. This sounds obsessive. It’s actually insurance.
Mark your board before planing — a pencil arrow on the end grain showing feed direction. I mark mine on both ends and the top surface because you can definitely mark it wrong. I have. One moment of carelessness and your board goes backward through the planer at 15 feet per minute. You watch $80 of curly maple get destroyed in three seconds while you’re standing there helpless.
Adjust Feed Rate and Blade Angle
Feed rate is everything with figured wood. Standard planers ship set to 10–15 feet per minute. For figured wood, cut that in half. Aim for 6–12 inches per minute on a tabletop planer. On larger industrial machines, 8–15 feet per minute works, but only if everything else is perfect.
Why slower? The blade needs time to cleanly sever each grain fiber before hitting resistance. At standard speed, the blade plows through interlocking grain too fast. Fibers lift and tear rather than cut cleanly. Slow the feed and the blade has time to cut each fiber properly. This isn’t negotiable — use standard feed rate on figured wood and you will get tearout.
Reduce depth per pass too. Standard operation uses 1/32-inch depth. On figured wood, stick to 1/32 to 1/16 inch maximum per pass. Some woodworkers go lighter on the worst pieces — 1/48 inch per pass. Yes, it’s tedious. But you’re taking more, lighter passes instead of fewer, heavy ones. The blade doesn’t fight the grain as hard. More passes overall, but each one comes through clean.
Skew the blade if your planer allows it. Some industrial machines and higher-end models let you angle the cutterhead slightly. A 10–15 degree skew changes the blade’s approach angle. Instead of cutting straight across the grain, the blade slices at an angle — much like hand planing. This dramatically reduces tearout on figured wood. If your planer has a skewable head, use it.
Combine all three: slow feed at 8–10 inches per minute, shallow depth between 1/32 to 1/16 inch, and skew angle if available. A board that would get destroyed in two minutes at standard settings comes through clean in 10 minutes with these adjustments.
Sharpen Blades and Check Chipbreaker Setup
A dull blade will tear figured wood every time. Not sometimes — every time. I tested this stupidly on curly maple — sent it through with dull blades, got immediate tearout. Sharpened the blades, fed the same board through with identical settings, got a clean surface. That was the moment it clicked.
Planer blades need genuine sharpness, not just “dull enough to be noticeable.” A blade duller than a butter knife will tear figured wood. Your blades should shave arm hair cleanly. If they won’t, they’re not sharp enough. Most hobby woodworkers don’t sharpen often enough. Apparently I’m the type who sharpens before each project rather than once yearly, and figured wood demands this approach.
Check your chipbreaker setup too. The chipbreaker (or pressure bar) sits above the blade and compresses wood fibers just before cutting. If the gap between chipbreaker and blade is too large, fibers don’t compress — they lift and tear instead. Typical tolerance is 1/32 inch. Check your planer manual for exact specs. Incorrect chipbreaker setup on figured wood is a guaranteed tearout trigger.
Clean around the blade area monthly. Sawdust and resin buildup trap moisture and dull the blade prematurely. I use compressed air and a small brush, more frequently if I’m processing figured woods constantly.
Owners comparing DeWalt packages should note that cutterhead performance is the same in both boxes; our DW735 vs DW735X comparison explains the accessory difference.
nn
When to Skip the Planer and Hand Plane Instead
Some figured wood is too risky for a planer, even with perfect settings. Heavily spalted maple with soft rot streaks. Extremely quilted or wavy stock where grain reverses every half-inch. Figured wood thinner than 3/4 inch where tearout ruins the board entirely.
Use a 4-square hand plane for these pieces. A sharp hand plane with proper grain direction and light strokes will handle wood that a power planer can’t. Yes, slower. Yes, more work. But a $60 hand plane and 20 minutes beats destroying a $100 piece of figured wood in seconds.
Be honest about your stock before you start. If the figured grain is extreme enough that you’re nervous about it, use the hand plane. Your time is cheaper than your materials.


Stay in the loop
Get the latest master wood crafters updates delivered to your inbox.