Why Router Bits Burn Wood in the First Place
Router bit burning has gotten complicated with all the conflicting advice flying around. Slow down, speed up, use a different bit, check your depth — everyone’s got a theory. Most of them are partially right. That’s what makes diagnosing this stuff so frustrating for woodworkers who just want clean edges.
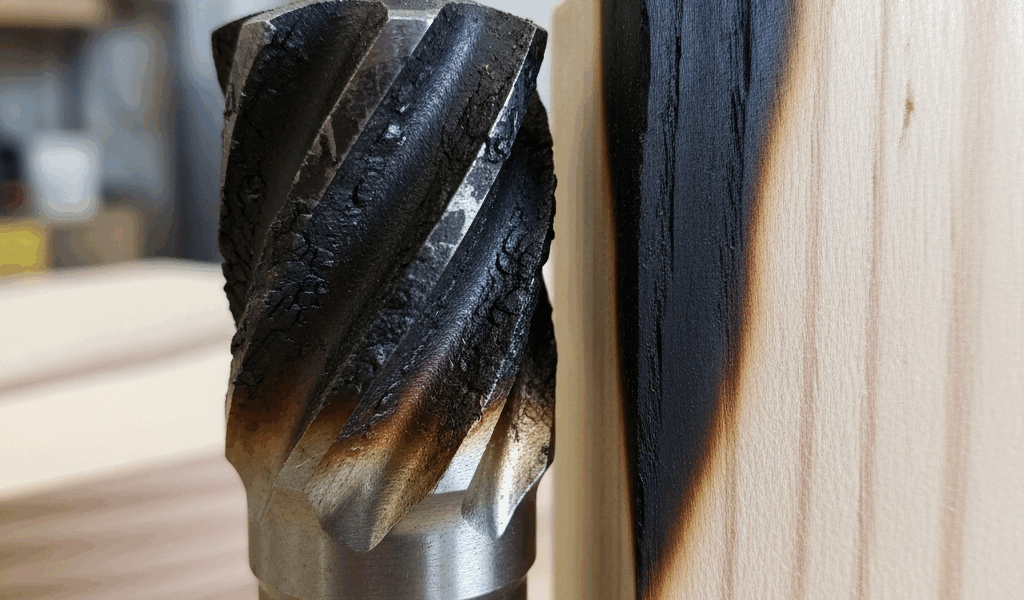
Here’s the core of it: heat builds faster than the bit can shed it. Friction between the carbide edge and wood fiber creates that scorched smell and dark, crusty residue you find on your workpiece. Your cutter is generating heat faster than it’s removing material. That’s the whole story.
Three things make this happen. A dull bit grinds instead of slices — it pushes through fibers rather than severing them cleanly. A feed rate that’s too slow keeps the bit spinning in roughly the same spot, essentially cooking the wood from below. And a depth of cut that’s too aggressive in a single pass overloads the flutes with sawdust, trapping heat with nowhere to go.
Probably should have opened with this section, honestly — I spent an entire Saturday afternoon torching through cherry before I realized my $40 Freud bit had become a glorified sanding tool. Don’t make my mistake.
How to Tell Which Problem You Actually Have
Before you replace anything or overhaul your technique, figure out what’s actually wrong. The burn pattern tells you almost everything — at least if you know what you’re reading.
- Burn on one side of the cut only — Your feed rate is too slow. The bit stays in contact with that face longer, building heat unevenly on just that side.
- Burn all around the edge, fairly even — Dull bit. It’s grinding uniformly instead of cutting cleanly in any direction.
- Burn marks only at entry and exit points — You’re pausing mid-cut. That half-second hesitation lets the spinning bit dwell and char the wood right there.
- Burn with visible packed dust in the flutes — Too much depth of cut, slow feed, or both working against you at once.
Run a test cut on scrap wood using your exact same settings. Take a photo of where the burn shows up. That one step saves you from fixing the wrong problem — which is, honestly, how most people spend their Sunday afternoons.
Fix a Dull or Dirty Router Bit
Start here before buying anything new. Carbide bits collect resin, pitch, and oxidized sawdust over time. A dirty bit performs almost identically to a dead one.
Soak the bit in carbide cleaner. Freud Bit Cleaner and Bosch Carbide Cleaner both run $8 to $12 a bottle and dissolve buildup in about 30 minutes. A cheaper option — spray oven cleaner directly onto the flutes, let it sit 15 minutes, scrub with an old toothbrush. Rinse it completely and dry it immediately so the shank doesn’t rust. This works shockingly well. Total cost around $3.
After cleaning, inspect the carbide edge by feel. Run your thumbnail gently across the flute — a sharp bit catches slightly and resists the motion. A dull bit slides smooth like glass. You can also hold the bit up to a bright shop light and look for a white haze along the cutting edge. That haze means wear.
If the edge feels sharp after cleaning and isn’t visibly rounded, you’re done — cleaning alone fixed the burn. If it still feels glassy or the edge looks worn down, the bit is genuinely spent. Carbide bits last roughly 40 to 100 hours depending on material and how hard you push them. A 1/2-inch spiral upcut runs $25 to $45 new. If you’re not sure, one more cleaning pass is cheap insurance either way.
Fix Your Feed Rate and Depth of Cut
This is where the counterintuitive part lives. Slower is not safer with routers — a slow feed rate is the burn culprit most people never suspect.
Pushing too slowly keeps the bit in contact with the wood longer, grinding instead of cutting. Proper feed feels steady and moderate — not aggressive, but not hesitant. You should see continuous thin shavings ejecting from the cut. Dust or nothing means you’re moving too slowly. That’s the tell.
The real diagnostic is feel. A properly fed router works but doesn’t strain. The bit bites smoothly. If the router bogs down, you’re either feeding too fast or the bit is dull. High-pitched whining with no visible shavings — you’re feeding too slowly. Both sounds become pretty recognizable after a few sessions.
On depth of cut: don’t take more than 1/2 inch in a single pass, especially in hardwoods. A clean 1/2-inch pass with proper feed rate is fine. Going deeper in one shot overloads the bit, clogs the flutes, and generates heat the setup can’t handle. Two passes at 1/4 inch each add maybe 20 seconds to your process and eliminate burning entirely.
Climb cutting — moving the router against bit rotation — cuts cleaner on grain tear-out but builds more heat and demands real control. Advanced territory. Skip it for now.
Quick Fixes for Specific Wood Species That Burn Easily
Some woods burn faster than others — resin content and grain density are the main factors. Here’s what matters by species.
Cherry burns because of its tight grain and mild resin that softens under heat. Reduce depth of cut to 3/8 inch maximum. Feed slightly faster than feels comfortable — cherry wants speed more than caution. A 1/4-inch spiral upcut outperforms straight flute bits here because it pulls material out rather than pushing it sideways.
Maple is dense and hard. Bits dull faster in maple than almost anything else, and feed rates need to stay aggressive to avoid grinding. Sharper bits help more than any other variable. If you’re burning hard maple, the bit is probably overdue for replacement. Premium carbide — something like Whiteside or Amana — makes a noticeable difference in this species specifically.
Pine burns differently from the hardwoods. The resin melts and smears rather than charring black, and it clogs bits faster than you’d expect from a soft wood. Clean your bit every 3 or 4 linear feet of routing. Use a shallower depth — around 1/4 inch — and move faster to clear chips before they cook onto the surface.
The pattern holds across all of them: denser woods and resinous woods burn faster because they’re harder to cut cleanly and they clog the flutes. When in doubt, shallow and fast beats deep and slow every single time.
Burned edges aren’t always catastrophic — a light sand with 120-grit gets you 95% of the way back. But the burn itself signals that something in your setup isn’t dialed in. Work through the diagnosis, fix the actual root cause, and the problem stops coming back. I learned that lesson the expensive way, one darkened piece of cherry at a time.


Stay in the loop
Get the latest master wood crafters updates delivered to your inbox.