What Drill Press Runout Actually Means
Drill press runout has gotten complicated with all the conflicting advice flying around. Some people blame cheap bits. Others blame the wood. I blamed both for years before I finally figured out what was actually happening. As someone who spent three hours drilling what should have been clean 3/8-inch holes for shelf pin templates, only to pull the template away and find every single hole egg-shaped and oversized by a sixteenth of an inch — I learned everything there is to know about runout the hard way. Today, I will share it all with you.
But what is runout? In essence, it’s when the bit tip wobbles in a circle instead of staying fixed at one point. Spin the chuck empty or with a bit installed and the tip traces an oval path rather than sitting dead center. But it’s much more than that. Left alone, runout means oversized holes first. Then bit breakage on anything smaller than 1/16 inch. Then tearout and splintering on entry. Small bits snap faster under lateral pressure — the wandering tip catches wood fibers at an angle and the grain just tears. Your carefully laid-out project starts looking sloppy before you’re halfway done.
How to Test for Runout Before You Start Guessing
There are two ways to measure runout: the proper way with a dial indicator, and the quick visual check that confirms something is wrong without telling you what or how bad.
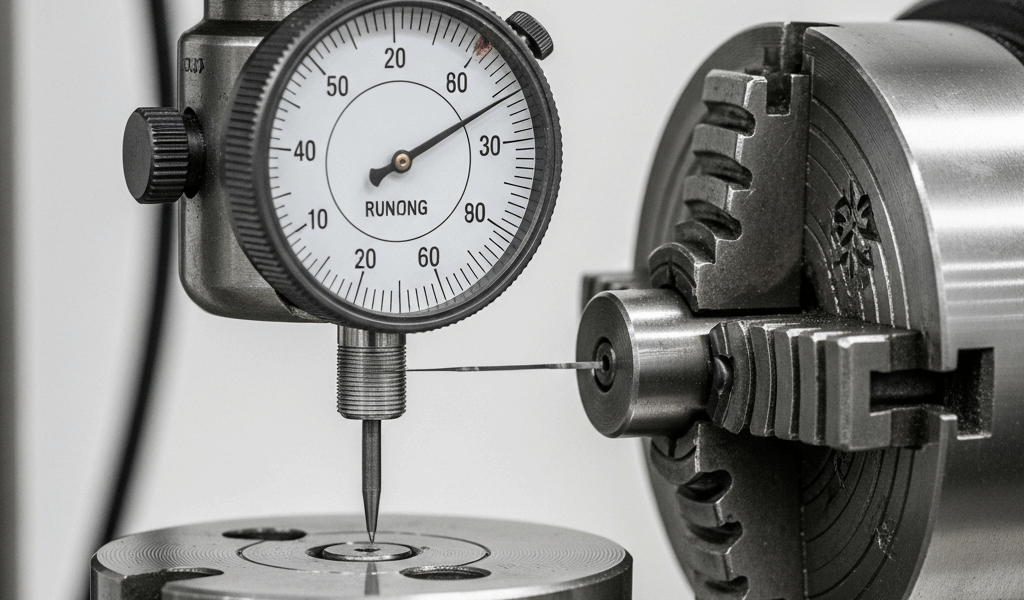
For the dial indicator method, while you won’t need a full machinist’s setup, you will need a handful of specific tools. A magnetic dial indicator base — Harbor Freight carries them for under $30 — a 0.0001-inch dial indicator, and a piece of ground steel rod or a spare drill shank. Clamp the magnetic base to your drill press table so the indicator tip touches the side of the rod while it sits in the chuck. Spin the chuck slowly by hand. The needle swings around the dial face, showing total runout in thousandths of an inch. Do this twice — once near the chuck body, once near the tip of the rod. Note exactly where the wobble shows up.
The low-tech version: mark a thin line around the bit shank with a Sharpie, spin the chuck up to speed, and watch where that line appears. If it’s moving in and out in a visible circle, you’ve got runout. Doesn’t tell you the magnitude. Does confirm something is loose.
For woodworking, anything under 0.005 inch — five-thousandths — is acceptable. Most people won’t notice the difference at that level. Above 0.010 inch and you’ll see oversized holes and binding. The sweet spot is under 0.003 inch. That’s what you’re chasing.
Here’s the part I glossed over for years: watch whether the wobble happens at the chuck body itself or only at the bit tip. Chuck dancing side-to-side is one problem. Chuck looks solid but the bit tip is tracing circles — that’s a completely different diagnosis. Don’t make my mistake of treating them the same.
Chuck Runout vs Spindle Runout — Finding the Real Culprit
Probably should have opened with this section, honestly. Most runout problems are chuck problems, not spindle problems. But you need to confirm which one you’re actually fighting before you spend a single dollar.
Remove the chuck completely. Install a test rod or ground shank directly into the spindle taper — nothing but the taper itself, no chuck involved. Measure runout at the tip with your dial indicator. Rod wobbles? Your spindle taper or spindle bearings are worn. Rod sits dead still and traces zero? The spindle is fine. Your chuck is the culprit.
That distinction changes everything. A bad spindle is a big, expensive fix. A bad chuck is usually a cleaning-and-reseating job or a $60 to $80 purchase. That’s what makes this diagnostic step endearing to us woodworkers — it’s free and it takes about four minutes.
The most common cause is a dirty or loose Jacob’s taper connection. Spindle end and chuck interior aren’t mating properly — coated in dust, old grease, or light rust. First thing to try, always. Second most common is a worn or low-quality chuck. Keyless chucks, especially import models under $40, tend to run higher runout than a quality keyed chuck. Third possibility is spindle bearing wear from age or from side-loading the chuck during use. That last one is the expensive scenario.
Fixes That Actually Work — Chuck, Taper, and Bearings
Dirty or Loose Jacob’s Taper
Remove the chuck. Clean the spindle taper end with acetone and a lint-free rag. Really clean it — get into the small grooves where dust packs in and sits for years. Clean the interior of the chuck taper the same way. Let both dry completely. Reinstall the chuck by hand until it seats, then tap it firmly upward with a wooden mallet and a wood block placed on top. One or two solid hits. The goal is seating pressure, not destruction.
Reinstall your test rod and check runout again. Most of the time, this step alone brings runout back under 0.003 inch. I’m apparently someone who spent money on a new Jacobs 14N chuck before realizing my old one just needed acetone and a firm tap — and the Jacobs works for me now while the cleaning alone would have worked then. Don’t make my mistake.
Worn or Low-Quality Chuck
If the taper is clean, tight, properly seated, and runout is still above 0.008 inch, the chuck jaws themselves are worn. You need a replacement. A decent keyed chuck from a reputable manufacturer — Jacobs, Rohm, Albrecht — runs $60 to $120. I prefer keyed chucks for this reason specifically. They hold concentricity better over years of use. A quality keyless chuck is also fine, but budget-model keyless chucks drift. Spend the extra $20 to $30 for brand recognition. A worn chuck won’t get better. It gets worse.
Spindle Bearing Wear
Frustrated by runout that persists even with no chuck installed, most people assume the whole machine is garbage. Sometimes it is. A spindle bearing rebuild or replacement on a benchtop drill press often runs $200 to $400 in labor if you’re sending it out. If your press is older than ten years and cost $150 new, you’re probably done with it. If it’s a 30-pound cast-iron tabletop model you’ve owned fifteen years, rebuild it. If it’s an industrial floor model — a Powermatic 2800B or a Clausing 2286 — absolutely rebuild it. Calculate cost versus replacement first. Don’t sink $400 into repairs for a $300 press. That math never works out.
Preventing Runout from Coming Back
After you’ve fixed the runout, keeping it fixed takes about 90 seconds of maintenance per session. Always clean the taper surfaces before reinstalling a chuck. Dust accumulates fast. Avoid side-loading the chuck during operation — leaning sideways pressure on the bit while drilling accelerates bearing wear and loosens the taper connection over time. Store bits in a case or roll organizer, not loose in a drawer where shanks get dinged and seating surfaces become marred.
So, without further ado — a drill press with runout under 0.003 inch after a thorough cleaning and proper reseating is absolutely capable of clean, accurate holes for any woodworking project you’ll actually tackle. Most of us just never bother to check. Check yours this week. You might be surprised what you find.

Stay in the loop
Get the latest master wood crafters updates delivered to your inbox.