Jointer Snipe Has Gotten Complicated With All the Conflicting Advice Flying Around
As someone who has ruined more board feet than I care to admit, I learned everything there is to know about jointer snipe the expensive way. Today, I will share it all with you.
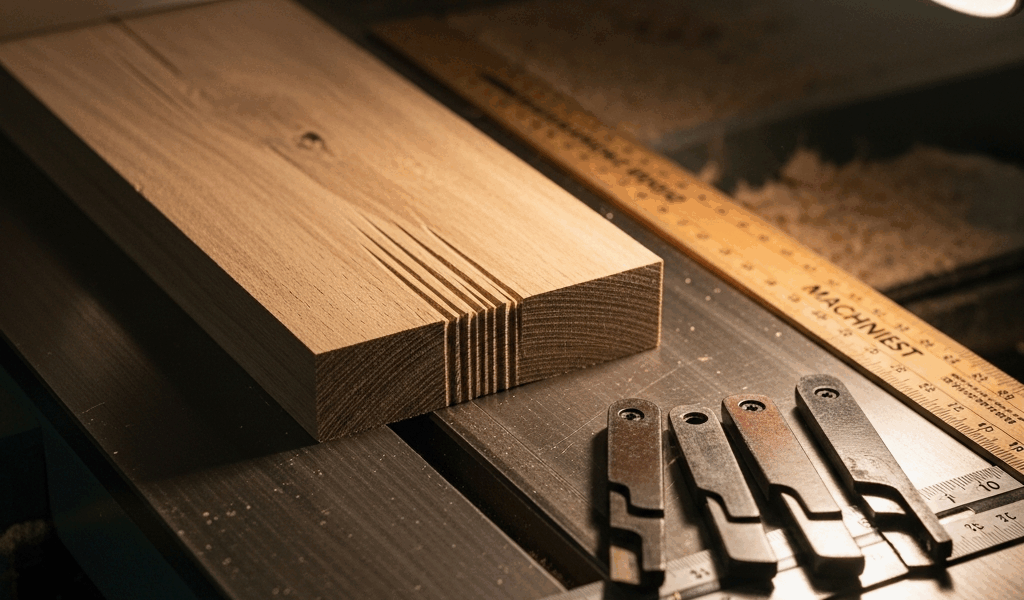
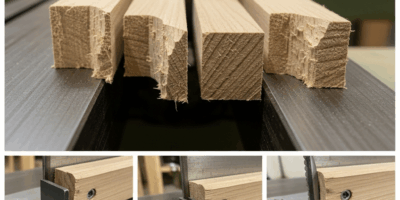
But what is jointer snipe? In essence, it’s that shallow gouge or divot that appears at the start or end of a board as it passes over the cutterhead. But it’s much more than that — it’s the thing that makes you want to throw a perfectly good board across the shop because the middle came out glass-smooth and the last three inches look like a drunk squirrel ran a spoon across them.
You’ve seen it. Maybe you’ve caused it a hundred times. Most guides gloss over the real culprits, which means you end up chasing ghosts — adjusting things that aren’t actually broken. Three mechanical failures cause this almost every single time: your outfeed table sits too low, your hand pressure transfers wrong during the cut, or your knives have dulled or picked up a nick. That’s it. That’s the whole list.
Step 1 — Check and Set Your Outfeed Table Height First
Probably should have opened with this section, honestly. This is where you start. Always.
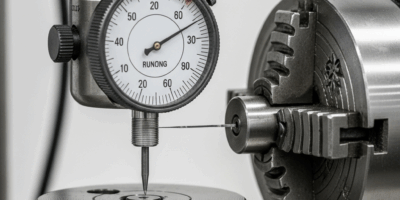
The outfeed table should sit perfectly flush with the highest point of the knife arc as it rotates. Drop it even 1/32 inch too low and the knives can’t support the board at the exit. It tips down. The knives catch the trailing edge. You get that characteristic shallow scoop — snipe, textbook and infuriating.
Grab a metal straightedge — 12 inches long works best — and place one end on the outfeed table. Let the other end hang over the cutterhead. Rotate the cutterhead by hand until one knife reaches its absolute peak. The straightedge should touch both the outfeed table and that knife tip simultaneously, with zero light gap underneath. Any gap at all means your outfeed table is too low. This is the most common culprit, honestly.
On jointers with adjustable outfeed tables, you’re usually working with either shims or adjustment screws. On my old 6-inch Powermatic — picked it up used for $340 back in 2014 — there’s a brass screw at each end of the outfeed table. Back out the lock nuts, turn the adjustment screws clockwise to raise the table, and check with the straightedge every quarter turn. It takes patience. It’s worth it.
Some newer jointers have outfeed tables that bolt down without any adjustment capability whatsoever. If yours is that type, contact the manufacturer — genuinely, not sarcastically. A table that’s out of spec by more than a few thousandths usually means a manufacturing defect or warping, and that’s their problem to solve, not yours.
Step 2 — Fix Your Hand Pressure Sequence Mid-Cut
I learned this lesson the hard way. Your hands are lying to you.
Most woodworkers split pressure across both the infeed and outfeed tables throughout the entire cut. Feels stable. Feels controlled. Creates snipe. Don’t make my mistake.
Here’s what actually works: start the board on the infeed table with 100% of your downward pressure on that table. Push forward. The moment the board hits the halfway point — centered over the cutterhead — shift all your pressure to the outfeed table. Rear hand carries the load now. Your infeed hand should be light enough to guide only, not press down at all.
That transfer has to happen smoothly and intentionally. Not abruptly. Not hesitantly. One fluid motion as the board glides through. A correct pass sounds different — consistent feed, no stuttering, no sudden resistance spikes. A sniped pass often includes a small hesitation right at the end. That’s your split pressure pulling the board down into the knife arc instead of supporting it out.
Feed speed matters too. Slower is safer, but too slow creates heat and dulls knives faster. I’m apparently a “3 to 4 seconds per pass” person and my Grizzly G0490 works for me while rushing through passes never does. Get the motion on scrap first — soft pine, nothing precious. Get it ingrained. Then move to your actual work. You’ll feel the difference immediately.
Step 3 — Rule Out Dull or Uneven Knives
Dull knives increase cutting resistance. They change how pressure transfers at the board ends, where your grip naturally lightens anyway. That combination punishes you.
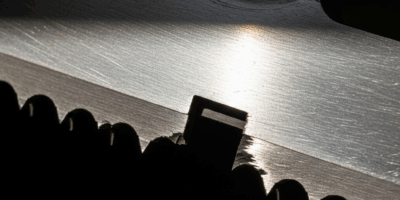
Check sharpness visually. Tilt the jointer so light hits the knife edges at a low angle. Sharp edges reflect no light — they appear dark, almost matte. Dull edges throw a visible bright line along their length. See that bright line? The knives need honing or replacement. Simple as that.
Feel matters too. Touch the knife edge lightly with your finger — knives off, cutterhead locked, safety first, obviously. Sharp knives feel almost sticky when you drag a fingertip perpendicular to the edge. Dull knives feel smooth. Weirdly smooth, actually, like a butter knife.
Even one nicked knife creates snipe-like marks that perfectly mimic setup problems. Run your hand over the outfeed table while the cutterhead rotates slowly. You’ll feel tiny vibrations from each knife strike. A nicked knife throws a rhythmic bump that stands out immediately. Stop, inspect, replace if needed. That’s what makes catching this early so endearing to us jointer people — one small check saves an entire afternoon.
Knife replacement frequency depends on your volume and wood species. Hardwoods dull faster. I change mine every 8 to 12 months with moderate weekend use. Working daily with exotics like purpleheart or ipe? Every 3 to 4 months is realistic. Budget for it.
When Snipe Persists — What Else to Check
So, without further ado, let’s dive into what to do when you’ve checked the outfeed table, nailed the pressure sequence, confirmed sharp knives — and snipe still shows up.
Loose infeed table gibs can allow tiny vertical movement that looks exactly like snipe but isn’t. The infeed table should not rock or shift when you press firmly on the corners. If it does, tighten the gib bolts on both sides — they’re usually at the front and rear of the table base. A quarter turn is often enough. Check again. Repeat.
Board length matters more than people think. If your board is shorter than the jointer bed, the back end dips as the leading edge exits the outfeed table. A good rule: your board should be at least as long as your jointer bed, preferably longer. For a 6-inch jointer, aim for boards at least 24 inches long. For an 8-inch, 30 inches minimum. Shorter than that and you’re fighting physics, which is a fight nobody wins.
That covers the four leading causes. Snipe is almost always a setup issue — not a machine defect, not bad luck, not a curse. Fix the setup and the snipe disappears.

Stay in the loop
Get the latest master wood crafters updates delivered to your inbox.