
What I’ve Learned About Furniture Wax (And Why It’s Worth Your Time)
As someone who’s spent way too many weekends refinishing thrift store finds, I learned everything there is to know about furniture wax. Today, I will share it all with you. Trust me, once you get the hang of this stuff, you’ll wonder why you ever reached for that can of spray polish.
So What Exactly Is Furniture Wax?
Furniture wax has gotten complicated with all the product options flying around, but at its core, it’s just a blend of natural or synthetic waxes that protect and beautify wood. The big three you’ll run into are beeswax, carnauba wax, and paraffin wax. Each one’s got its own personality.
Beeswax is the crowd favorite — honeybees make it, it goes on smooth, and it smells incredible. I’m a little biased toward beeswax because my grandfather always kept a tin of it in his shop. Carnauba comes from palm leaves down in Brazil, and it dries rock-hard with a serious gloss. Then there’s paraffin, which is a petroleum byproduct that won’t break the bank. It’s stable and gets the job done without any fuss.
Types at a Glance
- Beeswax: Goes on soft, gives you that warm, honey-toned sheen. My personal go-to for antiques.
- Carnauba Wax: Harder finish, high-gloss look. Great if you want that showroom vibe.
- Paraffin Wax: Budget-friendly and holds up well. Nothing flashy, but reliable.
Why Bother With Wax at All?
Here’s the thing — wax does something that a lot of other finishes don’t. It creates this thin protective barrier that keeps moisture out without sealing the wood shut. That matters because wood needs to breathe a little, but you don’t want water getting in there and causing warps or cracks down the road.
Beyond protection, wax makes wood look alive. There’s no other way to describe it. The grain pops, scratches fade, and everything gets this warm depth to it. And when something does get scuffed up? Just buff it out. That’s what makes furniture wax endearing to us woodworkers — it’s forgiving in a way that polyurethane never will be.
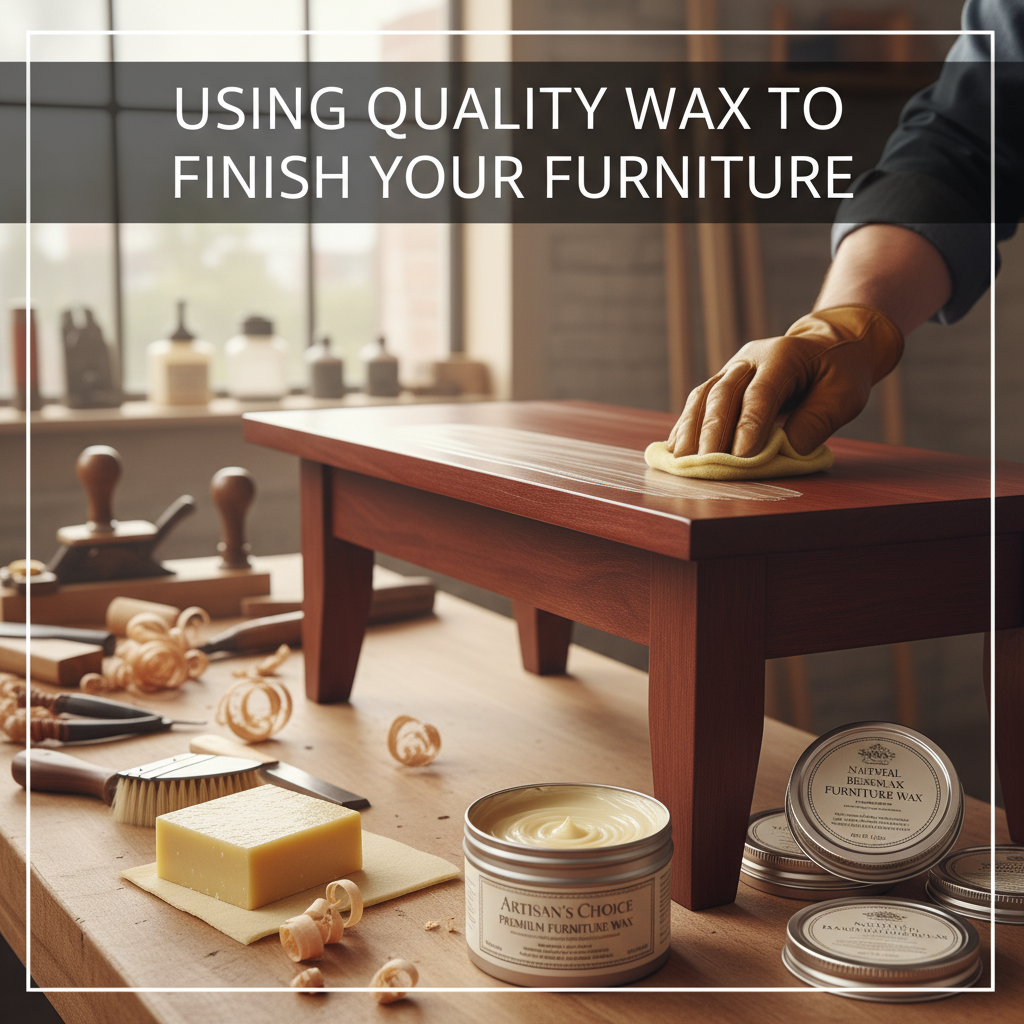
How I Apply Furniture Wax
Probably should have led with this section, honestly. Here’s my actual process, no frills:
First, clean the surface. I mean really clean it — dust, grime, old polish, all of it. A damp cloth usually works, but sometimes I’ll use a gentle wood cleaner if the piece has been neglected. Then grab a soft cotton cloth (old t-shirts work great), pick up just a small dab of wax, and work it into the wood using circular motions. Don’t go crazy — a little bit covers more than you’d think.
Let it sit for maybe five to ten minutes until it hazes over slightly, then buff with a clean cloth. The buffing is where the magic happens. You’ll feel the surface go from tacky to slick, and then it just starts to glow. It’s honestly one of my favorite parts of any finishing project.
How Often Should You Reapply?
This depends entirely on how hard the piece works. My dining table gets a fresh coat every six months or so because it takes a beating — hot plates, water rings, the whole deal. The bookshelf in my office? Maybe once every couple of years. A display cabinet that nobody touches? You could probably get away with waxing it once and forgetting about it for a long time.
You’ll know it’s time when the surface starts looking a bit flat or dry. That’s the wood telling you it wants some attention.
Mistakes I’ve Made (So You Don’t Have To)
- Glopping it on: More wax doesn’t mean more protection. It just means a sticky mess that attracts dust. Thin layers, always.
- Skipping the cleaning step: I did this once on a dusty old dresser. The dirt got sealed under the wax and scratched the finish. Learn from my pain.
- Half-hearted buffing: If you don’t buff enough, you end up with a cloudy, dull look. Put some elbow grease into it.
Picking the Right Wax for Your Project
The wood type and what you’re going for should drive your choice. Working on something antique or valuable? Beeswax is gentle and won’t cause problems. Want a modern, high-shine look? Carnauba’s your friend. Just finishing up a pine bookshelf for the kids’ room? Paraffin keeps it simple and cheap.
I’ve also found that darker waxes can enhance the color of walnut and mahogany beautifully, while clear wax keeps lighter woods like maple and birch looking natural. It’s worth experimenting on scrap pieces before committing to the final piece.
The Environmental Angle
If you care about this stuff (and I think most of us should), natural waxes like beeswax and carnauba are way better for the planet than synthetic alternatives. They’re biodegradable and come from renewable sources. I switched to all-natural waxes in my shop a few years back and honestly haven’t noticed any performance difference.
Beyond Furniture: Other Uses
Fun fact — furniture wax works on way more than just wood. I’ve used it on leather boots, metal tool handles, even on drawer slides that were sticking. Some folks in my woodworking group swear by it for conditioning cutting boards, though you’ll want a food-safe formula for that.
Bringing Old Furniture Back to Life
This is where wax really shines (literally). I picked up a beat-up oak secretary desk at an estate sale last year for forty bucks. Stripped the old gunk off, did a light sanding, and applied three thin coats of beeswax. The transformation was unreal. The grain came alive, the color deepened, and it looked like a piece that belonged in an antique shop — not on somebody’s curb.
The key with restoration is patience. Remove all the old finish first, sand gradually from medium to fine grit, and then let each coat of wax cure properly before adding the next one.
Layering Wax with Other Finishes
Here’s something a lot of beginners don’t realize — you can combine wax with oils or even put it over varnish. I sometimes apply a coat of tung oil first to nourish the wood deep down, let it cure for a few days, then add wax on top for that final protective layer and sheen. The oil does the heavy lifting for moisture resistance, and the wax gives you that buttery smooth feel.
Just don’t put wax under varnish or polyurethane — nothing will stick to a waxed surface. Wax always goes last.
Making Your Own Wax at Home
I started doing this a couple years ago and haven’t looked back. Melt some beeswax pellets in a double boiler, stir in mineral oil (or olive oil if you want to go fully natural), pour it into a tin, and let it cool. That’s it. The ratio I use is roughly 1 part beeswax to 4 parts oil, but you can adjust depending on how hard or soft you want the paste.
You can even add a few drops of essential oil — orange or lavender — if you want your shop to smell amazing while you’re working. My wife actually noticed the difference, which is saying something.
Store-Bought vs. Homemade: My Take
Commercial waxes are convenient and consistent. Brands like Howard and Briwax have been around forever for good reason. But the homemade stuff gives you total control over what goes into it, and there’s something satisfying about finishing a piece with wax you made yourself. I use both, honestly. Commercial for quick jobs, homemade when I want that extra personal touch.
Storing Your Wax Properly
Keep it sealed, keep it cool, keep it out of direct sunlight. That’s really all there is to it. I’ve had tins of wax last three or four years in my shop cabinet with no issues. If it dries out a bit, you can soften it up again with a tiny bit of mineral oil.
Reviving a Tired Finish
Sometimes a waxed piece just needs a refresh. Clean off any buildup with a soft cloth, apply a thin new coat, buff it out, and you’re done. I do this with my workbench every few months — it takes maybe fifteen minutes and makes the whole surface feel brand new.
Safety Stuff Worth Mentioning
Most furniture waxes are pretty benign, but some commercial products do contain VOCs. Work in a ventilated space, especially if you’re sensitive to fumes. Gloves aren’t a bad idea either, mainly because wax under your fingernails is annoying to deal with. Always check the label on whatever you’re using.
A Sustainable Way to Care for Wood
Using wax means you’re not spraying chemicals, you’re not generating waste from disposable products, and you’re extending the life of furniture that might otherwise end up in a landfill. It’s one of those small choices that adds up over time. I like knowing that the finish on my pieces is something that’s been used by woodworkers for hundreds of years — and for good reason.
A Little History
Wax finishing goes back centuries. Before there was polyurethane or lacquer, craftsmen were reaching for beeswax to seal and protect their work. There’s a reason these methods have stuck around. They work, they’re accessible, and they produce results that still hold up against modern alternatives.
What’s New in Furniture Wax
Modern formulations have come a long way. You can now find waxes with added UV protection, heat resistance, and water-repellent properties. Some newer products blend traditional waxes with modern polymers for enhanced durability. It’s worth keeping an eye on what’s available, even if you’re a traditionalist like me.
Busting a Few Myths
I hear these all the time, so let’s set the record straight. “Wax attracts dust” — nope. A properly buffed wax surface actually repels dust better than bare wood. “Wax builds up and gets thick” — only if you’re overdoing it. Thin coats and proper maintenance prevent any buildup issues. “Wax is hard to remove” — mineral spirits handle it easily if you ever want to switch to a different finish.
Tips from My Workbench
- Always test first: Hit an inconspicuous spot before committing to the whole piece. Different woods react differently.
- Less is more: A thin coat outperforms a thick one every single time.
- Don’t rush the buff: Take your time here. This is where your finish goes from “okay” to “wow.”
Common Questions I Get
- Can I wax over paint? Absolutely — just make sure the paint has fully cured first. I’ve waxed over chalk paint many times with great results.
- Is it safe for cutting boards? You’ll need a food-grade wax specifically, but yes, they do exist and work well.
- How do I strip old wax? Mineral spirits on a cloth will dissolve it. Work in sections and wipe clean as you go.


Stay in the loop
Get the latest wildlife research and conservation news delivered to your inbox.