What Blade Wobble Actually Means and Why It Matters
Table saw blade wobble has gotten complicated with all the conflicting advice flying around. Forums say replace everything. YouTube says it’s always the arbor. Neither is usually right.
But what is blade wobble, exactly? In essence, it’s lateral movement — the blade plate swinging side to side as it spins. But it’s much more than that. Runout is the related cousin: teeth drifting in and out at the contact point rather than swinging wholesale. Both problems widen your kerf, scorch the wood, and make the motor work harder than it should. A blade that’s 0.010 inches off can initiate kickback because the wood binds unevenly against one side of the cut.
I learned this the hard way. Pushed a piece of red oak through a wobbly blade once — had the stock nearly launch back at my chest. The culprit turned out to be a flange issue I could have caught in about 30 seconds. So. Let’s make sure that doesn’t happen to you.
So, without further ado, let’s dive in.
Step 1 — Check the Blade Itself First
Probably should have opened with this section, honestly. Most people skip the blade entirely and start blaming the saw. Don’t make my mistake.
Remove the blade completely. Unplug the saw first — non-negotiable, full stop. Loosen the arbor nut, which is reverse-threaded on most contractor and cabinet saws, then slide the blade and flange hardware off the shaft. Set the blade flat on something clean and level. A 12-inch granite tile from the flooring aisle works great. So does a sheet of tempered glass or the cast-iron top of another saw.
Now roll it slowly. A warped blade won’t sit flat — you’ll see daylight shifting between the plate and the surface as it rotates. Some people hold a metal straightedge against the plate at several points around the circumference. Same idea, slightly more precise.
Carbide-tipped blades can sometimes be trued by a sharpening service. Cost runs about $20–$35 depending on blade diameter and your ZIP code. Steel blades? Just replace them. A quality 10-inch carbide blade — a Freud LU84R or a Diablo D1040X, for instance — runs $40–$90 new, which is worth every cent for the cut quality and safety margin alone. Contractor-grade blades from big-box stores are frequent culprits here. I’m apparently sensitive to blade wobble and the Freud works for me while cheap generic blades never feel right, even fresh out of the box.
If the blade checks out flat and true, move to the flanges.
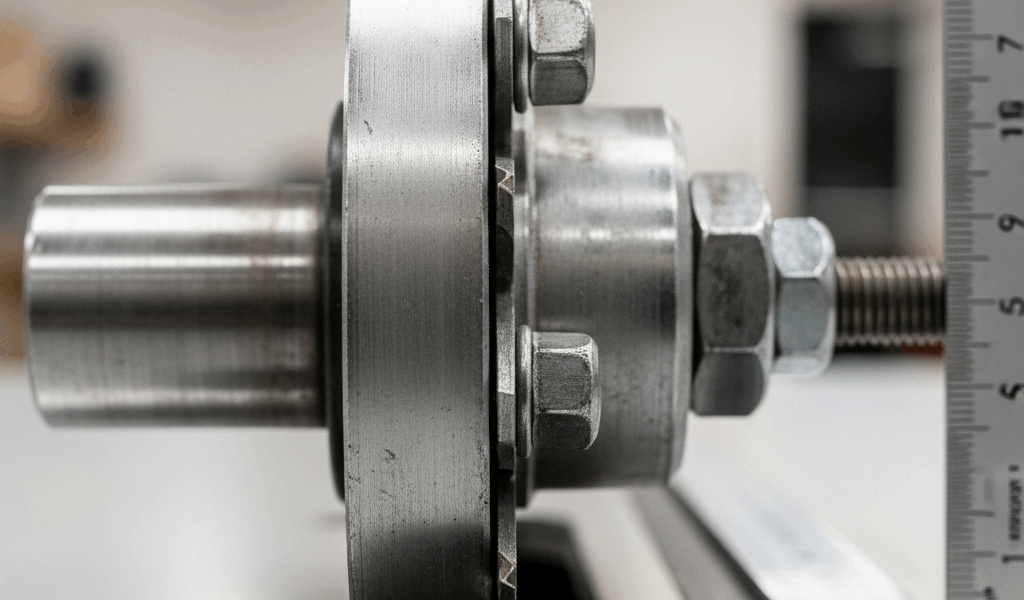
Step 2 — Inspect the Arbor Flange and Washers
The arbor flange is the metal disc that clamps the blade against the shaft. That’s what makes flange condition so endearing to us woodworkers — a perfect blade will still wobble if the flange is even slightly off.
With the blade removed, look at both flanges: the fixed one pressed onto the arbor and the removable outer one. Wipe both flat faces with a clean rag. Dust, resin, and fine wood particles collect here constantly. That buildup alone throws runout off immediately — people overlook this every single time.
Run your fingernail across each face once it’s clean. Feel for burrs, dents, or any raised edges. A ding as small as 0.005 inches creates noticeable wobble at the blade tip. Any roughness at all means the flange needs to go. Most aftermarket flanges run $15–$25 and take about five minutes to swap out.
A dial indicator makes this step more precise — and plenty of woodworkers already own one. Clamp the saw, mount the indicator against the arbor shaft, and sweep the flange face. Under 0.002 inches of runout is excellent. Under 0.005 inches is acceptable. Above that, replace it regardless of how it looks visually.
Check the arbor washer while you’re in there. Some saws use a conical washer that seats the blade at a specific angle. A bent or scored washer kills proper contact. Deformed? Replace it. Usually under $5.
Step 3 — Test the Arbor for Runout or Play
This is the least common cause. It’s also the worst-case scenario — a worn arbor means professional service or a bearing replacement job that isn’t cheap.
With everything removed, grip the bare arbor shaft just below where the flange seats. Push and pull laterally, perpendicular to the shaft axis. Feel for any movement at all. A quality table saw arbor should have zero lateral play. Even 0.001 inches translates to visible wobble out at the blade tip where leverage magnifies everything.
Spin the shaft by hand. It should rotate smoothly with even, light resistance throughout the full rotation. Listen for grinding or gritty spots inside the bearing housing. Stiffness, roughness, or any side-to-side movement means the arbor bearings are failing.
Arbor replacement runs $200–$600 depending on the saw model — a Delta Unisaw sits at one end of that range, a cheap benchtop saw at the other. A professional shop typically handles the work. Before you pay that bill, though, make absolutely certain the blade and flanges are ruled out. I’ve personally seen three people convince themselves it was the arbor when a $40 blade swap fixed everything in fifteen minutes.
How to Reassemble and Verify the Fix
Once you’ve identified the problem — new blade, cleaned flange, replaced washer, whatever it turned out to be — reassemble carefully.
Wipe the arbor shaft clean where the flange seats. Any dust here compromises the seating immediately. Slide the blade onto the arbor with the teeth pointing toward you at the front of the saw. Install the outer flange, then hand-tighten the arbor nut.
Snug, not gorilla-tight. Cranking it with full wrench force can actually warp the flange face against the blade plate. Snug means you can’t move it with finger pressure anymore — not that you’re leaning on a 12-inch breaker bar like the nut personally insulted you.
Spin the blade by hand through several full rotations. It should turn freely with no binding or resistance.
To verify the wobble is actually gone, tape a pencil to the fence about 2 inches above the blade height. Power the saw on briefly with no stock — just watch the gap between the blade tip and the pencil as it spins. Consistent spacing means you’re done. Gap changing as it rotates means something’s still off. Go back through the checklist from the top.
One more thing: if the cut still looks wide or the edge is scorching even after wobble is resolved, check blade tension and tooth set next. Separate issue. But that’s where you’d look anyway.
Blade wobble fixes are almost always simple once you know where to start. Begin with the blade, work through the flanges, rule out the arbor last. Most of the time you’re back to cutting in under 20 minutes.

Stay in the loop
Get the latest master wood crafters updates delivered to your inbox.