Router jigs have gotten complicated with all the commercial options, YouTube builds, and varying opinions flying around. As someone who has built probably two dozen different jigs over the years, I learned everything there is to know about which ones actually matter – and which ones collect dust. Today, I will share it all with you.
The router transforms from spinning terror to precision joinery tool once you master jigs. Dadoes, rabbets, and box joints all become repeatable, accurate, and fast when the right jig guides the bit. Build these three setups and you’ll handle most carcass joinery efficiently.
Dado Jigs

A dado cut houses one board into another, shelves into case sides being the classic example. The challenge is consistent width exactly matching the shelf thickness, positioned exactly where you need it. I ruined more shelf units than I care to admit before I built a proper dado jig.
Build a T-square jig from 1/2-inch plywood. The long fence runs across your workpiece; the shorter crosspiece registers against the board edge. This guarantees the dado runs perpendicular to the edge every time. Probably should have led with this section, honestly – the dado jig is the one I use most often.
Position the jig by measuring from the crosspiece to your dado location. The router rides against the fence, so offset your measurement by the distance from bit edge to router base edge. Mark this offset on the jig itself to avoid recalculating each time. I have little tick marks on mine for my three most common router setups.
Use a straight bit matching your shelf thickness. For plywood, which is slightly undersize, you may need an undersized bit or two passes with a smaller bit. Test fit on scrap before committing to the workpiece. That’s what makes plywood frustrating – the nominal thickness is never the actual thickness.
Rabbet Setups
Rabbets create L-shaped recesses along board edges, perfect for back panels or box bottoms. You can cut them with a straight bit against a fence, but a rabbeting bit with bearing guide works faster.
The bearing rides along the uncut surface, automatically limiting the rabbet width. Different bearing sizes create different widths without changing bits. A set of bearings costs less than multiple bits and changes faster. I keep three sizes on the bench – 1/4″, 3/8″, and 1/2″ rabbets cover almost everything I build.
Set rabbet depth by lowering the bit. Most back panel applications want 1/4 to 3/8 inch depth. Test on scrap to ensure the back panel will sit flush or slightly recessed. I made the mistake once of cutting too shallow on a full cabinet run – every back panel stuck proud and I had to deepen every rabbet with the piece already assembled. Never again.
For stopped rabbets that don’t run the full length, clamp stops on your workpiece to register router starting and stopping points. Plunge at the start, rout to the stop, and lift cleanly to avoid burning. The lift is the tricky part. If you hesitate at all with the spinning bit in the cut, you’ll get a burn mark that’s almost impossible to sand out.
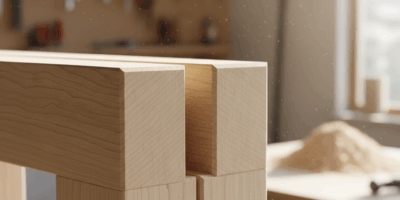
Box Joint Jig
Box joints, sometimes called finger joints, interlock like machine-cut dovetails without the angled pins. They’re incredibly strong and satisfying to cut once your jig is tuned. I have a soft spot for box joints – they look great with minimal layout and zero hand tool work.
The jig rides in your router table miter slot. A key pin, exactly matching your bit diameter, positions each cut. The workpiece butts against the key, advances one kerf width after each cut, and produces perfectly spaced fingers.
Build the jig base from stable plywood or MDF. The fence must be exactly perpendicular to the miter slot. Install the key pin one bit-width from the bit, measured precisely. Any error here multiplies across every finger. I measured mine with dial calipers and it still took three attempts to get the spacing right.
Set bit height to slightly exceed your stock thickness. The fingers should project enough for flush-trimming after assembly. Too shallow leaves weak fingers; too deep wastes material and creates excessive tear-out at the top of the cut.
Making the First Cut
Start with the workpiece edge against the key. This first cut creates a notch at the corner. Lift the piece, move the new notch over the key, and cut again. Repeat until you’ve crossed the entire width. The rhythm becomes almost meditative once you find it.
The mating piece starts differently. Place the first cutoff from piece one over the key pin, butt piece two against it, and begin cutting. This offsets piece two by exactly one kerf, so the fingers of both pieces interlock. That’s what makes box joints endearing to us woodworkers – the geometry is clever enough to feel like magic even though the execution is straightforward.
Tuning the Jig
If joints are too tight, move the key slightly closer to the bit. Too loose, move it slightly away. These adjustments are tiny fractions of the bit diameter. Make test cuts in scrap until the joints slide together with firm hand pressure.
Once tuned, mark your settings or use stop blocks to recreate them. A working box joint jig is worth preserving for future projects. Mine has survived three shop reorganizations because I know exactly how much grief it would be to rebuild and retune.
Router jigs require upfront investment in setup time. But that investment pays dividends across dozens of projects. Build once, use forever, and wonder why you ever cut these joints any other way. The jigs I built eight years ago are still producing accurate cuts every time I pull them off the shelf.