Best Paint Sprayer for Furniture — HVLP vs Airless for a Smooth Finish
Finding the best paint sprayer for furniture is something I got wrong twice before I got it right. I’ve sprayed probably three hundred pieces of furniture over the last eight years — dining chairs, dressers, cabinets, the occasional ornate headboard that made me question my career choices — and the number one mistake I see woodworkers make is buying a sprayer designed for walls and wondering why their furniture finish looks like an orange peel. The tool matters. The type of sprayer matters even more. Here’s what I actually use, what I’ve tested, and what I’d buy if I was starting over today.
HVLP vs Airless for Furniture — The Short Answer
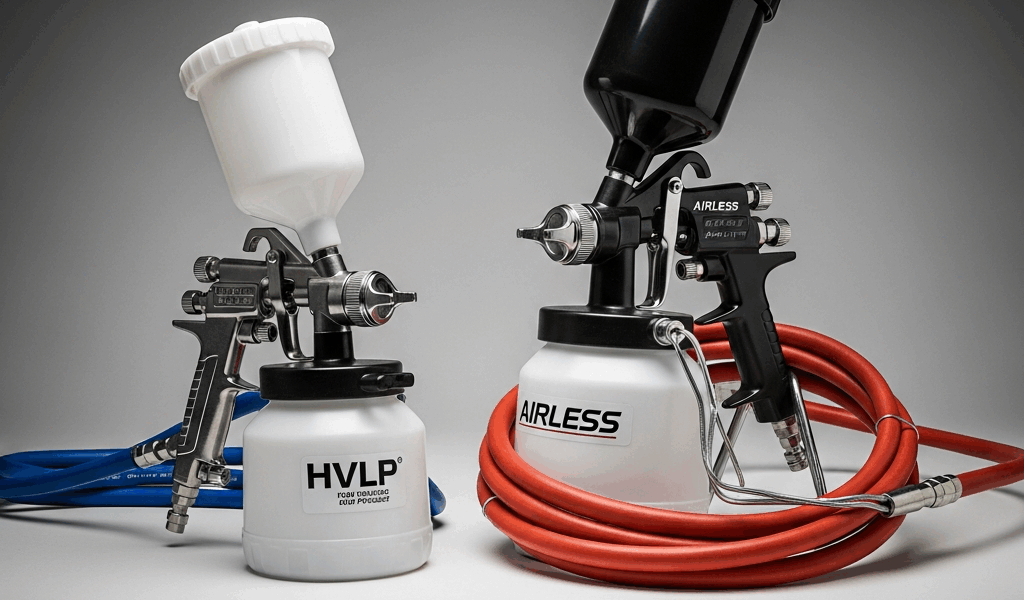
HVLP wins for furniture about 90% of the time. Full stop. If you’re painting a dresser, a set of dining chairs, a side table, a cabinet — HVLP is the right tool. I’ll explain exactly why, but the short version is that furniture rewards finesse and punishes power.
HVLP stands for High Volume Low Pressure. The atomization happens at low pressure, which means the paint particles hitting your workpiece are finer and slower. That gives you two things that matter enormously on furniture: a softer spray pattern that doesn’t blow wet paint off sharp edges and detail work, and dramatically less overspray bouncing back at you. When I switched from an airless to a dedicated HVLP turbine unit about six years ago, I cut my finishing time in half — not because the sprayer was faster, but because I stopped spending an hour fixing runs and blowback on carved legs.
Airless sprayers work by forcing paint through a small tip at extremely high pressure — often 2,000 to 3,000 PSI. That’s fantastic for exterior house painting, fences, large flat cabinet boxes, or anything where coverage speed matters more than precision. I still own an airless. I reach for it when I’m doing a production run of flat cabinet doors or painting the interior of a large wardrobe carcass where I need to lay down material fast. But for any piece with curves, moldings, turned legs, routed edges, or detail work? Airless will fight you every step.
The physics are simple: high pressure creates overspray. Overspray bounces. Bounced paint lands on a surface you just sprayed, and now you’ve got texture. On a fence, nobody cares. On a painted nightstand meant to look lacquered, it’s the difference between a piece you’re proud of and one you sand back and start over. I’ve done both.
One honest caveat — airless does have an edge in one specific furniture scenario. Large, flat, horizontal surfaces. If you’re spraying a big farmhouse tabletop with a waterborne polyurethane and you want to lay down a thick, even coat fast, a fine-finish airless tip (something like a 210 or 310 tip) can produce excellent results. But that’s maybe 10% of the furniture work most woodworkers do. For everything else, HVLP.
Best HVLP Sprayers for Furniture Under $200
Probably should have opened with this section, honestly, because most people reading this have a budget and want a straight answer. Here it is: the two sprayers I recommend to woodworkers who are just starting to spray furniture and don’t want to spend professional money are the Fuji Semi-PRO 2 and the Wagner FLEXiO 3500. They’re different enough that your choice between them depends on how serious you are.
Fuji Semi-PRO 2 — Around $175
The Fuji Semi-PRO 2 is a 2-stage turbine HVLP system. The turbine generates the airflow; you dial in the fluid control with the needle adjustment on the gun. I bought my first one for $169 at a Woodcraft store and used it almost exclusively for two years before upgrading. It handles latex, chalk paint, milk paint, and waterborne polyurethane without complaint, though anything thicker than latex usually needs thinning by about 10%.
The gun that ships with it — the T70 — is decent. Pattern control is good for a unit in this price range. You get a round pattern and a fan pattern, and switching between them takes about thirty seconds. The biggest limitation is that it’s a 2-stage turbine, which means on heavy-bodied products you’ll feel it working. Chalk paint thinned to the right consistency sprays beautifully. Full-bodied latex primer? It’ll do it, but you’ll notice the motor laboring.
What I like: consistent atomization, easy cleanup, the turbine unit doubles as a fairly effective dust collector in a pinch (don’t actually use it for that). What I don’t like: the hose is only 13 feet, which feels short when you’re moving around a large piece, and the cup is gravity-fed at about 400ml, so you’re refilling it more often than you’d like on bigger projects.
Wagner FLEXiO 3500 — Around $120
The Wagner FLEXiO 3500 is a different animal. It’s a handheld turbine unit — the turbine and gun are all one piece — and the lower price reflects that. I’ve used it extensively for smaller projects: picture frames, decorative boxes, chair rails, that kind of work. It performs. The iSpray nozzle that ships with it is specifically designed for wider fan patterns on flat surfaces, and the Detail Finish nozzle is genuinely excellent for fine work.
The tradeoff is that holding a turbine in your hand gets heavy fast. My arm was tired after about forty-five minutes spraying a set of four dining chairs. It’s also louder than a turbine system where the motor sits on the floor. And overspray is slightly higher than with the Fuji, though still dramatically better than any airless in the same price range.
Buy the FLEXiO 3500 if you’re doing occasional projects and want an all-in-one unit you can store in a small cabinet. Buy the Fuji Semi-PRO 2 if furniture finishing is something you do regularly and you want a more professional experience without spending professional money.
Best HVLP Sprayers for Furniture Over $200
Humbled by a particularly difficult set of kitchen cabinet doors — the finish kept showing turbulence marks from my Semi-PRO 2 on the flat center panels — I ended up upgrading to a 5-stage turbine system. The difference was immediate and not subtle.
Fuji Q5 Platinum — Around $770
The Fuji Q5 Platinum is a 5-stage turbine HVLP system and it is, without exaggeration, the sprayer I’d buy if I was starting a small custom furniture finishing business today. The 5-stage turbine generates significantly more air volume than a 2-stage unit, which means atomization is finer and you can spray thicker coatings — waterborne lacquers, conversion varnishes, even some oil-based products — without heavy thinning.
The gun that ships with it, the T75G gravity-feed gun, has a non-bleed design that stops air flow when you release the trigger. This matters more than it sounds. With a bleed-type gun, air keeps flowing even when you’re not spraying, which disturbs the dust in your shop and lands it right on your wet finish. I lost entire finishing sessions to this problem before I understood what was happening.
The Q5 also runs quieter than lower-stage units. Not silent, but noticeably softer. If you spray indoors or in an attached garage, your household will notice the difference. Street price is typically $749–$779 depending on where you buy it. It’s an investment, but it’s a professional tool at a prosumer price.
Earlex 5500 — Around $200
The Earlex 5500 sits right at the boundary of under/over $200 and is worth including because it represents one of the better values in furniture finishing. It’s a 2-stage turbine like the Fuji Semi-PRO 2, but Earlex ships it with a higher-quality gun — the HV5500 gun has excellent fluid control and a nice spray pattern right out of the box.
I used an Earlex 5500 for about a year when my Fuji was being repaired and came away impressed with its consistency on waterborne topcoats. Milk paint over a chalk-painted dresser came out nearly perfect on the first try. The 13-foot hose is the same limitation as the Fuji Semi-PRO 2, and the 1-liter cup is a genuine improvement. If the Fuji Q5 is out of budget and the Semi-PRO 2 feels entry-level, the Earlex 5500 is the move.
Spray Technique for a Glass-Smooth Finish
The best sprayer in the world will not save bad technique. I learned this the hard way spraying my first set of Shaker-style cabinet doors — ran the gun too slow, too close, and turned three coats of waterborne lacquer into a bumpy mess that took four hours of sanding to fix. Technique is everything.
Distance and Speed
For furniture finishing, maintain 6 to 8 inches between the gun tip and the surface. That’s closer than most general painting guides suggest. Closer distance means less atomized paint is drying in the air before it hits the surface, which means better flow-out and fewer dry-spray artifacts. Move the gun at a consistent speed — I aim for roughly 12 inches per second, which is faster than most beginners think is right. Fast passes, thin coats.
Overlapping Passes
Every pass should overlap the previous one by about 50%. Spray the edge of your fan pattern over the center of the last pass. This sounds like it would create heavy buildup, but because you’re moving fast and laying thin material, it evens out. Inconsistent overlap is the cause of most streaky finishes I’ve diagnosed for other woodworkers.
Thinning Ratios
Almost every product needs thinning for HVLP spraying. Here are the ratios I use consistently:
- Waterborne polyurethane (Minwax, General Finishes) — 10% water by volume
- Chalk paint (Annie Sloan, Rust-Oleum Chalked) — 15–20% water
- Milk paint (Real Milk Paint Co.) — mixed thinner than manufacturer recommends, roughly 1:1.25 powder to water
- Waterborne lacquer (Target Coatings EM6000) — 5–10% water depending on temperature
- Oil-based polyurethane — 10% mineral spirits; switch to an oil-compatible gun cup and clean immediately
The viscosity cup test is worth doing if you spray regularly. A #4 Ford cup runs about $20 on Amazon. Aim for a drain time of 20–30 seconds for most waterborne topcoats through HVLP. If it drains in 12 seconds, it’s too thin and you’ll get sags. If it takes 45 seconds, thin it more or you’ll get orange peel.
Sanding Between Coats
Sand between every coat. Not optional. 320-grit after the first coat to knock down any dust nibs or raised grain, 400-grit between subsequent coats. I use a Mirka sanding block — nothing fancy — and a tack cloth before every new coat. The sanding isn’t about removing material; it’s about creating a mechanical key for the next coat and eliminating any texture that’s built up. Skipping this step is the single fastest way to end up with a finish that looks sprayed rather than poured.
Three thin coats sanded between each will outperform two thick coats every single time. Thin coats dry faster, sand easier, and don’t sag. The total dry film thickness ends up similar, but the surface quality is dramatically better. This is the lesson that took me the longest to actually internalize, and I still catch myself trying to rush it when I’m on a deadline.


Stay in the loop
Get the latest master wood crafters updates delivered to your inbox.