Biscuit joinery has gotten complicated with all the “real joinery” gatekeeping, Domino vs biscuit debates, and pocket screw evangelism flying around. As someone who has used a plate joiner for fifteen years across everything from simple edge-joining to complex casework, I learned everything there is to know about when this technique earns its keep and when you’re better off with alternatives. Today, I will share it all with you.
Biscuit joinery sits in an interesting spot among woodworking techniques. It’s not as traditional as mortise and tenon. It’s not as quick as pocket screws. But for certain applications — especially panel glue-ups and frame assembly — nothing else combines speed, accuracy, and strength quite the same way.
What Biscuit Joinery Actually Does

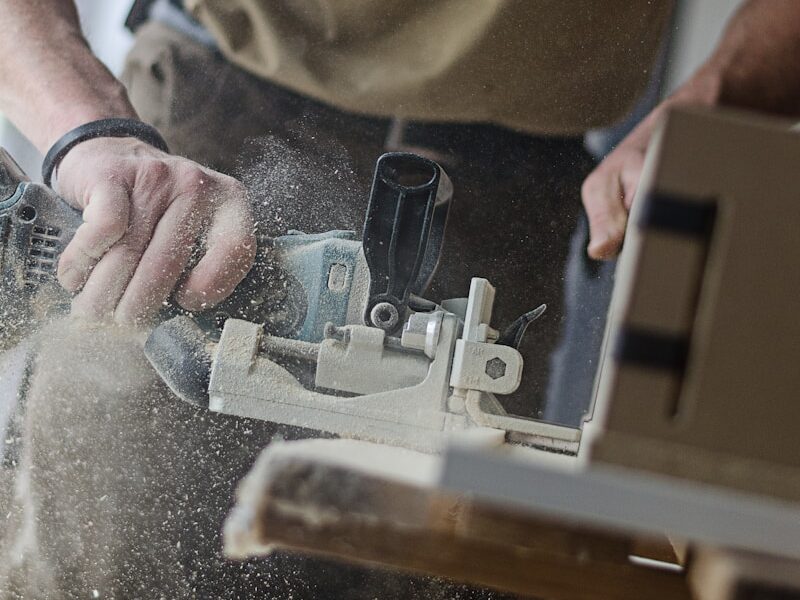
A plate joiner (also called a biscuit joiner) cuts a crescent-shaped slot into wood. You insert a compressed beech wood biscuit into the slot, add glue, and clamp the joint. The moisture from the glue causes the biscuit to swell, creating a tight mechanical and chemical bond.
That’s what makes biscuit joinery endearing to us production woodworkers — the key insight is that biscuits primarily provide alignment, not strength. In an edge-to-edge panel glue-up, the long-grain glue joint is already stronger than the wood itself. The biscuits just keep the boards from shifting during clamping.
For frame and carcase construction, biscuits do add structural support—but they’re not a substitute for proper joinery in load-bearing applications.
Biscuit Sizes Explained
Biscuits come in three standard sizes:
| Size | Dimensions (mm) | Best For |
|---|---|---|
| #0 | 47 x 15 x 4 | Thin stock (1/2″), narrow rails, face frames |
| #10 | 53 x 19 x 4 | 3/4″ stock, general purpose joinery |
| #20 | 56 x 23 x 4 | Thick stock, maximum strength applications |
The rule is simple: use the largest biscuit that fits your stock. For 3/4″ plywood or solid wood, #20 is standard. For narrow face frame members, drop to #10 or #0.
Where Biscuit Joinery Excels
1. Edge-to-Edge Panel Glue-Ups
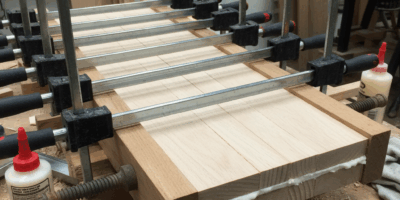
This is where biscuits truly shine. When gluing boards into a tabletop or panel, biscuits prevent the frustrating slip that happens when you apply clamping pressure. Mark your biscuit locations every 6-8 inches, cut the slots, and suddenly your glue-ups go from wrestling match to predictable process.
2. Plywood and Sheet Good Joinery
Biscuits are arguably better for sheet goods than solid wood. Plywood edge grain doesn’t glue well on its own, so the biscuit provides mechanical connection that glue alone can’t achieve. Particle board and MDF—common in cabinet work—benefit similarly.
3. Miter Joints
Miters are notoriously weak because you’re gluing end grain to end grain. A biscuit across the miter adds significant strength. The plate joiner’s fence adjusts to 45 degrees, making this setup straightforward.
4. T-Joints and Case Construction
When building cabinets or bookcases, biscuits provide quick, accurate alignment for shelves meeting side panels. Mark both pieces together, cut the slots, and assembly becomes much faster than with clamps and prayer.
Where Biscuits Fall Short
Probably should have led with this section, honestly. No technique is universal, and knowing when NOT to use biscuits matters more than knowing when to use them. Skip biscuit joinery when:
- Structural loads are significant: Table legs, chair joints, bed frames—these need mortise and tenon or other robust mechanical joinery
- Stock is too narrow: Below about 2″ width, there’s not enough material for reliable slots
- You’re working with end grain: Biscuits add minimal strength to end grain joints (use dowels or splines instead)
- Maximum strength is required: When failure isn’t an option, traditional joinery still wins
Step-by-Step: Cutting Perfect Biscuit Joints
Step 1: Mark Your Reference Lines
Dry-fit your pieces exactly as they’ll be assembled. Using a combination square or simply aligning edges, mark centerlines across both pieces at each biscuit location. These marks must align—if they don’t, your joint won’t close properly.
For panel glue-ups, mark every 6-8 inches. For frame joints, two biscuits per joint is typical.
Step 2: Set Your Depth
Adjust the plate joiner’s depth stop to match your biscuit size (#0, #10, or #20). The slot will be cut slightly longer than the biscuit to allow lateral adjustment during assembly.
Step 3: Set Your Fence Height
For centered joints in 3/4″ stock, the fence typically sits at about 3/8″ from the blade. Most plate joiners have preset stops for common thicknesses. The goal is centering the slot in the stock thickness.
Step 4: Cut the Slots
Hold the plate joiner firmly against your workpiece, aligning the reference mark on the tool with your pencil mark. Press the body forward—the spring-loaded blade will plunge, cut the slot, and retract. The whole cut takes about one second.
Key points:
- Keep firm downward pressure on the fence
- Don’t force the plunge—let the blade do the work
- Clear chips between cuts for accurate registration
Step 5: Dry Fit First
Always dry fit before adding glue. Insert biscuits without glue and check that everything aligns. This is your chance to catch errors.
Step 6: Glue and Assemble
Apply yellow wood glue to the slot walls and the biscuit itself. Don’t over-apply—excess glue causes premature swelling and difficult insertion. Work quickly; you have about 5-7 minutes of open time before the biscuit begins swelling.
Clamp with even pressure across the joint. Standard clamps work fine; you’re not fighting the wood to stay aligned, so extreme pressure isn’t necessary.
Common Mistakes and How to Avoid Them
Slots Don’t Align
Cause: Reference marks weren’t made with pieces held together, or the fence wasn’t held firmly during the cut.
Fix: Always mark both pieces simultaneously. Check that your fence is tight and doesn’t shift during plunge.
Biscuit Proud of Surface
Cause: Slot isn’t centered in the stock thickness.
Fix: Check fence height setting. Make test cuts in scrap before cutting project pieces.
Biscuit Won’t Insert After Glue
Cause: Biscuit absorbed moisture and swelled before insertion.
Fix: Keep biscuits dry until assembly. Apply glue to slot first, then quickly insert biscuit.
Weak Joint
Cause: Not enough glue, or biscuits were already swollen from humidity exposure.
Fix: Store biscuits in sealed container with dessicant. Apply adequate glue to both slot and biscuit surfaces.
Choosing a Plate Joiner
The plate joiner market has been stable for years. You’ll see the same names recommended repeatedly because the fundamental technology hasn’t changed—and the good tools last decades.
Best Value: DeWalt DW682K
The DW682K has been the industry workhorse for over 20 years. Its rack-and-pinion fence adjustment is precise and stays put. The 6.5 amp motor handles hardwoods without hesitation. At around $200, it’s the sweet spot for serious hobbyists and professionals.
Check DeWalt DW682K Price on Amazon
Going Cordless: DeWalt DCW682B
If you already own DeWalt 20V batteries, the cordless version makes sense. It’s lighter (5.5 lbs vs. 6.6 lbs), and the freedom from cords is genuinely nice when working on large panels. Performance matches the corded version.
Check DeWalt DCW682B Cordless Price on Amazon
Biscuits: Don’t Cheap Out
All biscuits are made from compressed beech, but quality varies. Cheap biscuits may be inconsistent in thickness, leading to loose slots or alignment problems. The price difference is minimal—buy quality biscuits in bulk.
Check WEN #20 Biscuits (100 Pack) on Amazon
Storage Matters
Biscuits are hygroscopic—they absorb moisture from the air. Swollen biscuits won’t fit slots properly and won’t expand further during glue-up, resulting in weak joints.
Store biscuits in:
- Sealed plastic container with a silica gel pack
- Original packaging if unopened
- Climate-controlled shop (not damp garage)
If you suspect your biscuits have absorbed moisture, spread them on a tray and bake at 200°F for 30 minutes to drive out moisture. Let cool before storing in an airtight container.
Biscuits vs. Alternatives
Biscuits vs. Dowels
Dowels require more precise drilling and don’t allow lateral adjustment. But dowels work in narrower stock and provide more shear resistance. For chairs and tables, dowels often win.
Biscuits vs. Pocket Screws
Pocket screws are faster and require no drying time. But they leave visible holes (even filled), and the mechanical connection differs. Use pocket screws for shop furniture and jigs; use biscuits when appearance matters.
Biscuits vs. Dominos
Festool’s Domino system is essentially biscuit joinery evolved—larger, stronger tenons with tighter tolerances. If budget allows, Dominos are superior for most applications. But at $1,000+ for the tool, biscuit joiners remain the practical choice for most shops.
Final Thoughts
Biscuit joinery won’t replace traditional techniques, and it was never meant to. What it offers is speed and consistency for specific applications. A panel glue-up that used to involve fighting boards, cauls, and careful clamping becomes a 10-minute operation. Cabinet assembly moves faster when you’re not worrying about alignment.
Learn when to use it, practice the technique, and a plate joiner becomes one of those tools you reach for more than you expected.
This article contains affiliate links. Purchases made through these links help support our content at no additional cost to you.


Stay in the loop
Get the latest master wood crafters updates delivered to your inbox.