“`html
Why Over-Clamping Ruins Joints More Than Under-Clamping
I spent three years convinced my glue joints were failing because I wasn’t using enough clamp pressure. Turns out, I was doing the opposite — and doing it hard. Over-clamping is the silent killer in woodworking, one that produces visible damage you’ll blame on everything except the actual culprit.
Here’s what happens mechanically when you squeeze too hard. Excessive clamp pressure forces the glue completely out of the joint. You end up with what’s called a “starved joint” — wood-to-wood contact with little or no adhesive binding the two surfaces together. The joint looks perfect initially. Then it splits or separates months later under any stress.
At the same time, the clamp pads themselves crush wood fibers directly beneath them. Hardwoods resist this less than you’d think; I’ve seen quarter-inch indentations in walnut that required planing the entire panel flat. Softwoods like pine or Douglas fir get crushed even faster. The wood around the clamp point turns into a pulpy mess that won’t sand out cleanly, honestly.
A third failure mode happens when uneven clamping pressure shifts alignment. One clamp tightened aggressively while others sit loose creates racking forces that twist the joint before glue sets. You remove the clamps. The joint looks acceptable. Then it moves or creaks under load.
How to Tell If You’re Clamping Too Hard Right Now
The diagnostic signs are there if you know what to look for:
- Glue ooze patterns — A thin, uniform bead of glue around all edges means adequate pressure. A thin spray of glue or completely dry edges with no visible squeeze-out suggests you’ve starved the joint.
- Indented clamp pads — Run your fingernail perpendicular across where the clamp pads sat. If you feel a distinct ridge or depression, you crushed the wood fibers. Press gently; crushed wood feels softer and compresses further.
- Uneven joint gaps — Flip the assembly over and look at the glue line from underneath. One side of a butt joint sits flush while the other side has gaps? Your clamp pressure was uneven or excessive on one end.
- Visible fiber crushing around clamp points — The wood surface looks bruised or darkened. This is permanent unless you plane it away.
- Glue drying too fast in the clamp — A completely dry glue line within an hour suggests most of the adhesive was forced out rather than curing in place.
Probably should have opened with this section, honestly. Most woodworkers don’t inspect their joints this carefully until something fails six months later and they’re wondering what went wrong.
Ideal Clamping Pressure by Wood Type and Joint Style
The numbers matter. I’ll give you ranges you can actually apply without owning a hydraulic gauge.
Hardwood butt joints (oak, maple, walnut) need 150–200 PSI across the joint surface. Softwood butt joints (pine, spruce, fir) need 100–150 PSI. Edge gluing — boards joined edge-to-edge — requires 100–150 PSI regardless of wood type. Mortise-and-tenon joints need only 50–100 PSI; the mechanical interlock carries most of the load, and excessive pressure just crushes the tenon shoulders.
Here’s how to estimate without a gauge. Tighten your clamp until you see a uniform glue bead about the thickness of a toothpick around the joint. Stop there. You can apply gentle downward pressure with one finger; it shouldn’t budge the clamp handle. If you need two hands or significant effort to close the clamp, you’re over-tightening.
For edge gluing, use cauls — straight boards clamped across the panel to prevent cupping. Space clamps every 12–18 inches. Use hand-pressure only to close each clamp. No wrenching. A 5-gallon bucket is the gold standard test: if you can lift it with one hand holding just the clamp handle, pressure is in the right zone.
A practical rule that works: the glue line should be barely visible once it dries. If it’s a thick, obvious seam, you weren’t using enough pressure. If the joint is completely invisible but you crushed the surrounding wood, you used too much.
Three Ways to Control Clamp Pressure and Stop Over-Tightening
Method 1: Use Caul Pads (Easiest)
This is my primary defense against over-clamping damage. Caul pads distribute pressure across a wider area, reducing the point-load that crushes wood. Materials that actually work:
- Hardwood scraps (1/2 to 3/4 inch thick) — free if you save your cutoffs
- Cork or leather pieces ($8–15 for a sheet) — stick to the clamp pads with contact cement
- Rubber-faced cauls from Bessey (around $12 per pair) — reusable and forgiving
A 2-inch wide caul pad spreads the force over 2 square inches instead of 0.5 square inches. That’s a four-fold reduction in pressure density. I use cork pads for hardwoods and rubber for anything softer, and I’m apparently the type who gets meticulous about these details.
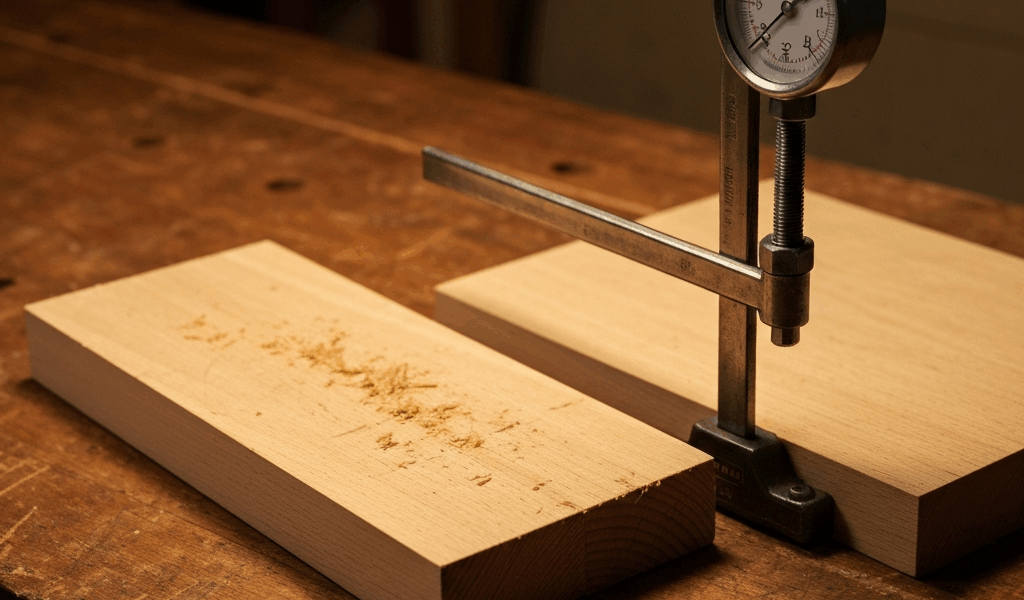
Method 2: Install a Pressure Gauge or Fish Scale Check
A $15–30 mechanical pressure gauge threaded into a small test block lets you dial in exact PSI. Alternatively, use a fish scale ($12–20) hooked under the clamp pad: tighten until the scale reads your target weight, then divide that by the pad area in square inches. This takes five minutes per clamp setup but eliminates guessing.
I do this once per clamp type to calibrate my “feel,” then I stop doing it. After a month of consistent practice, you develop muscle memory for the right tightness without the tools.
Method 3: Preset Stop-Blocks or Mechanical Limits
Some woodworkers attach a wooden stop-block to the clamp screw so it can’t tighten past a predetermined point. This is overkill for most work — at least if you’re building one-off pieces. It becomes essential if you’re building multiple identical projects and need consistency. It removes the human variable entirely.
Fixing Joints Damaged by Over-Clamping
Not everything is salvageable, but here’s what you can attempt.
For starved joints where glue was squeezed out — the joint will fail. Don’t try cosmetic fixes. Disassemble it, clean out the old glue with a chisel and scraper, and re-glue with proper pressure. This is the honest answer, even if it costs you time.
For crushed wood fibers around clamp pads, assess the depth first. If the crushing is under 1/16 inch, sand the entire surface with 80-grit then 120-grit and move on. The strength is fine. If it’s deeper, you’ll need to plane or sand the entire panel to eliminate the ridge, which wastes material. On large panels, I’ve accepted the crushing as character rather than rework.
For visible surface crushing on finished pieces, wood filler matching the stain can disguise shallow indents. Deeper crushing requires planing, which works only if you have thickness to spare. On a fine table top, over-clamping damage is often permanent — don’t expect magic fixes.
For joints that shifted during clamping and now alignment is off — re-glue if the gap is tight enough to clamp without forcing. If it’s already set and creates a visible offset, a sharp hand plane can fair the edge on edge-glued panels. Butt joints that shifted are typically scrap.
Honestly, the best fix is prevention. I’ve re-glued maybe five joints in the last two years. I’ve scraped far more projects that got crushed during the first clamp session than failed from weak glue lines.
Over-clamping feels like caution — like you’re doing the job right. In reality, it’s one of the fastest ways to wreck a joint before you even remove the clamps. Dial back the pressure, use caul pads, and check your glue lines carefully. The joints will hold better, and your stock will thank you.
“`

Stay in the loop
Get the latest master wood crafters updates delivered to your inbox.